#How to use mac disc drive with pc
Explore tagged Tumblr posts
Visit Tumblr Blog
Explore Tumblr blogs with no restrictions, modern design and the best experience.
Last Seen Tumblr Blogs


Fun Fact
Hackers stole 65M passwords from Tumblr in 2013.
Text
How to play the original Secrets Can Kill in 2025 without game discs
oh my god I almost just wrote 2015 instead of 2025
I've successfully been playing the original SCK for the past couple hours (including "changing discs" and reopening save files), but it's possible I could run into problems later, so no promises that this is a perfect solution.
This method still requires installing the game files, so I think it'll only work on Windows, sorry Mac users. I'm using Windows 11. I was also able to install and open the game on a Windows 10 computer, but I didn't actually attempt to play it there.
All you need are copies of the game .iso files and a virtual hard disk drive program. The post got long, so details are under the Keep Reading. It's not actually complicated, but apparently I talk a lot lol
The .iso files:
.iso files are digital replicas of optical discs (CDs, DVDs, etc). You probably don't have the original Secrets Can Kill discs, so you will need to...acquire these files.
[NOTE: My personal ethics say to not pirate shit from small studios or independent creators. HeR is a small studio and if people don't buy stuff from them, they can't afford to make new games. However, the original SCK is abandonware and literally can't be purchased, so imo, it's perfectly acceptable to pirate it.
I want to strongly discourage anyone from pirating any of the other games which can be purchased. They have 50% off sales all the time (including through today, 1/5/25) and a bunch of the games are as low as $5 when on-sale. The digital downloads don't come with any kind of restrictive licenses, so if you get a new computer, you can transfer the files and keep your games forever. Pls keep supporting HeR so that we can maybe keep getting new games]
I recommend getting the SCK .iso files from archive.org. That link will take you to a software search for Nancy Drew Secrets Can Kill. As of this post, there's only 1 result that's actually for the original SCK.
Anytime you're downloading software from a site where anyone can upload stuff, there's always a possibility of viruses. Check and see if the uploader seems sketchy (Are there comments on any of their uploads warning about viruses? Is the account brand new?). You could run the files through a virus checking program, but apparently .iso files frequently throw false positives. The SCK uploader seemed legit, but I initially downloaded and installed these on an old computer that I don't use, just in case.
There will be a bunch of files available to download. You specifically need to download the "ISO IMAGE" files. There should be two of them- disc 1 and disc 2. After downloading, I recommend moving the files out of your downloads folder because you'll need to access them frequently.
The virtual hard disk drive program:
Like I said above, .iso files are digital copies of physical discs. Similarly, the way to use the files is via a digital version of a physical disk drive. "Mounting" the .iso files to a virtual disk drive is analogous to inserting a disk into a physical drive.
Windows 8 and above has a built-in ability to mount .iso files, but when I tried that, I got a notice that the file was corrupted. The internet recommended that a dedicated program might have more functionality. I chose the Elby Virtual CloneDrive program, which is free.
Installing the game:
After downloading and installing the virtual disk drive software, navigate to your .iso files, and right click on the file for disc 1. Scroll to "Open with", and choose "Mount Files with Virtual CloneDrive". It will now show up as a CD drive in This PC in the file explorer:

Double-click to open the drive and scroll to "setup.exe". Open the file to run the game installer.
The game will install in a typical way. I think the only non-default option I chose was "No, I will install DirectX myself". I didn't actually install DirectX, but everything is working fine ¯\_(ツ)_/¯ idk, maybe now it's built-in to Windows or something.
Running the game:
To run the game, just open the game shortcut like a normal program. If you can't find the shortcut or didn't create one during the install, go to your C: drive -> Program Files (x86) -> Nancy Drew -> Secrets Can Kill -> Game.exe
In order for the game to run, you need to have Disc 1 still mounted to your virtual drive. Unless you specifically unmounted it, it should still be there, but if you get a pop-up that says to insert the disc, the problem is probably that the disc isn't mounted.
I was expecting that I would have to run the game in Compatibility Mode to handle that it was made for fucking Windows 98, but I didn't have to do anything. It just worked with no adjustments. A miracle!!
Changing discs:
The original Secrets Can Kill was too big to fit on a single disc at the time it was made! They split it across multiple discs by location. The school is on disc 2, while all other locations are on disc 1. So if you need to move from the diner to the school for example, you have to change discs.
When you need to change discs, you'll get this screen:

WITHOUT closing the game program, minimize the game. Easiest way is by either pressing the windows key or alt+tab. Navigate to your .iso files, right click on the new disc, and choose Mount.
Navigate back to the game and click OK. Easy as that!
Whenever you fully exit and re-open the game, you have to open it with disc 1 mounted. So if you saved while at the school, you'll open the game with disc 1, load your save, and immediately switch over to disc 2.
And I think that's everything! Phew! This got a lot longer than I planned on. Feel free to send me questions if you're having trouble, but I may not know the answer. I'm not an expert in this stuff, I just spent some time poking around at it last week is all.
Have fun! Go manatees!
142 notes
·
View notes
Text
Wishlist Haul
All I asked for were pants, and those are coming Saturday. But you all came through in a big way with my wishlist and helped me solve some problems that have really been bugging me lately.
One of my biggest current issues is my decision to use my M1 MacBook Air as my main computer until I can move my PC upstairs at some distant time in the future. Which means I need to ask a lot more of it. And it is capable, as these Apple Silicon devices are amazing and very zippy, but I only got 256 GB of storage because I thought this would just be a secondary computer while I was taking care of my dad.
So I need storage. And if you do photography and use Lightroom, you know you need *fast* storage. In the days of spinny disc drives, going back and forth between images was maddeningly slow. I already hate the process of culling photos and picking the best ones. And sometimes you'd need to find 5 winners out of a few hundred. And when it took 3 seconds to switch between every photo, I wanted to die. And honestly, it could still be better.
But one of the best solutions is a super fast SSD. Which I had. I bought it right before my parents got especially ill and was planning to install it in my PC. But my priorities changed and I just never found the energy.
The problem is that was an internal NVME SSD. I needed it to be external.
Which is where this little thingie comes in.
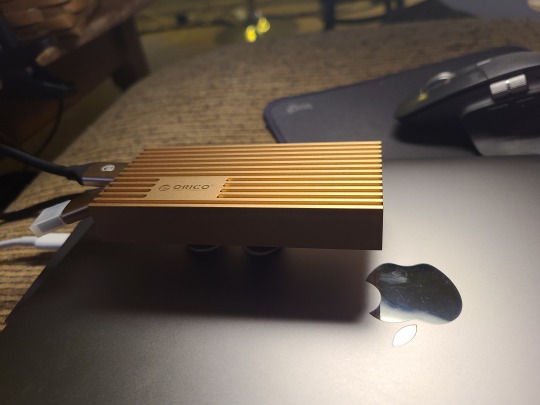
This is an NVME enclosure, and if you are looking for cheap, fast external storage, this is so much better than those external SSDs they overcharge for. For $200 they give you a 2TB drive that can read about 2000 MB per second. Or you can get a 2TB NVME and this enclosure for the same price and get 3000 MB per second. Not only that, but it is upgradeable. In a year when 4TB is $100, you can plop that in. And the Mac's Thunderbolt 4 has a max speed of around 5000 MB/s, so there is room to improve there as well. Though sometimes advertised speeds are not reality speeds.
The only thing you need to be aware of is these drives run hot. You're going to think there is something wrong with them. Like, they top out at 90C. Which is nearly 200 degrees in freedom units.
I wanted a convenient way to mount my drive, but I didn't want 200 degrees on the back of my screen, so... MAGNETS!
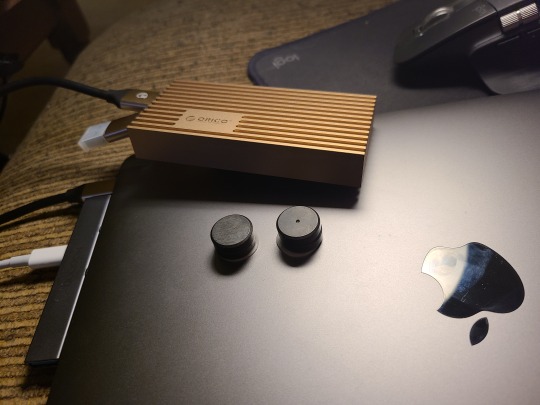
And I can stack a few more if that section starts feeling too hot.
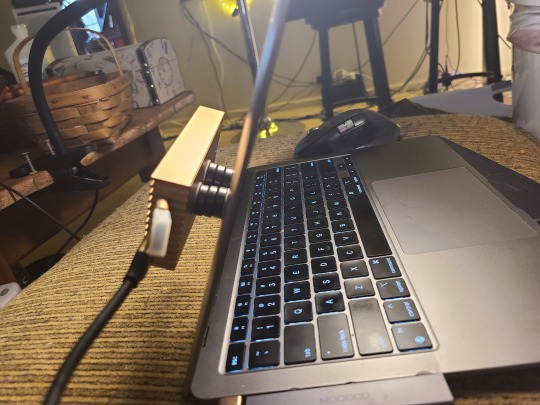
So, I have that problem solved. I can now use this as my main computer and work on my photography.
Next up... fashion!

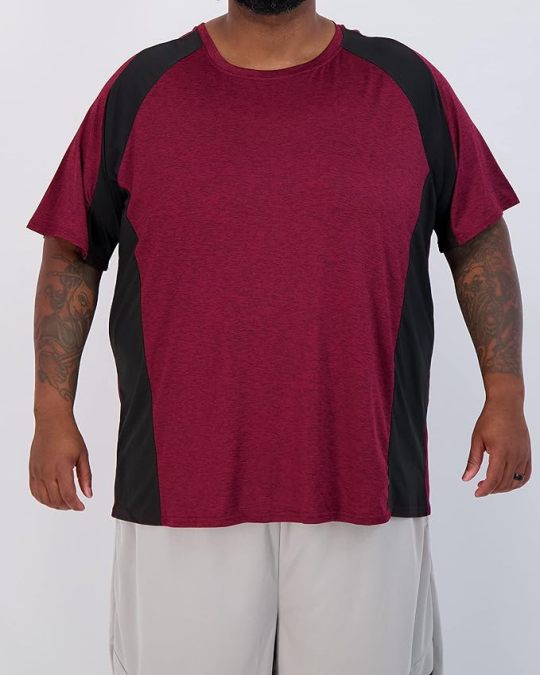
I'm going out more and I want to look a little more presentable. I thought these two tone shirts looked a little more fashionable. And they are very comfortable too. I have a red one that I think I'm going to wear on my trip. I know you can't see the two tone well in the picture, so here is the product photo of the red one.
Next problem?
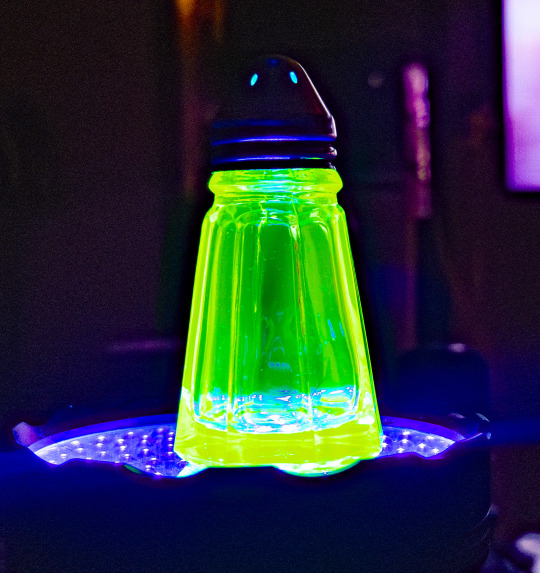
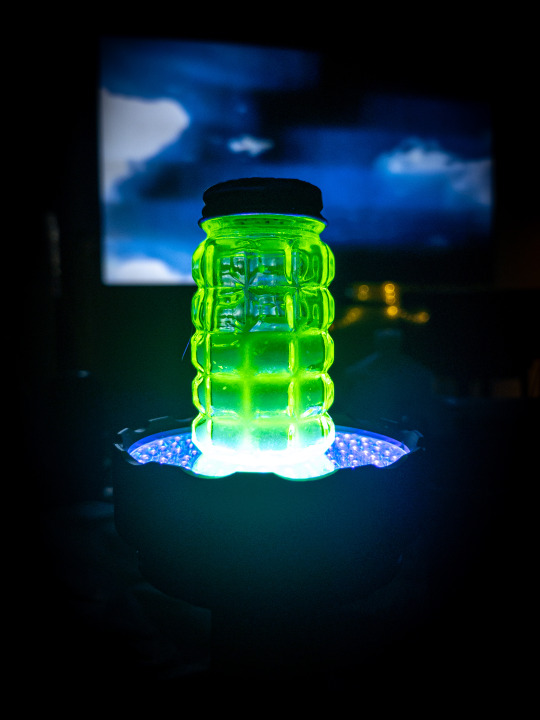
Well, it's maybe not a problem so much as something cool I wanted. A black light!
My mom had all of this uranium glass and I had no idea my salt shaker was marginally radioactive all these years. I really wanted to take a proper photo of some of the glass before it all gets sold at auction. So this should be a fun experiment.
I will say, if you don't have uranium glass, don't get a black light. You will want to burn your house down. It does not matter how clean you think you got something... you didn't clean it enough. And I have all of this dry flaky skin on my feet. It doesn't hurt. It doesn't bother me. You can't even really see it unless you look really close. But when I shined the light on my feet they looked like they had some undocumented disease. I will not be sharing a photo of that.
But the depression glass, that's super neat.
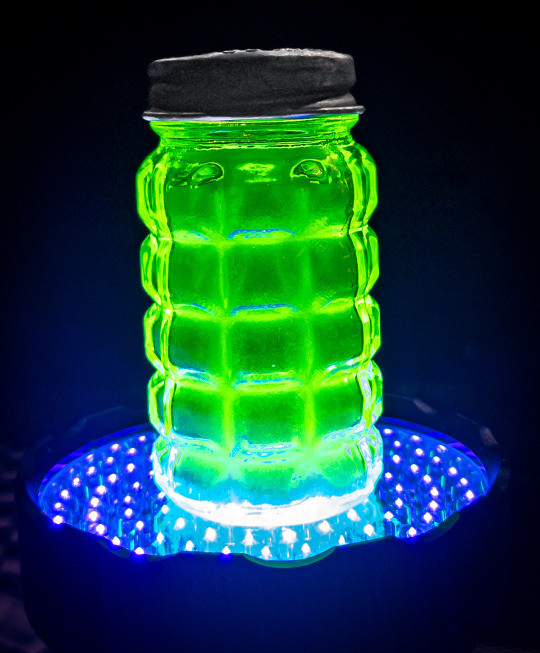
Some proper photos coming soon I hope. Maybe after my trip.
Next problem!
My key fob. This thing is a piece of shit.
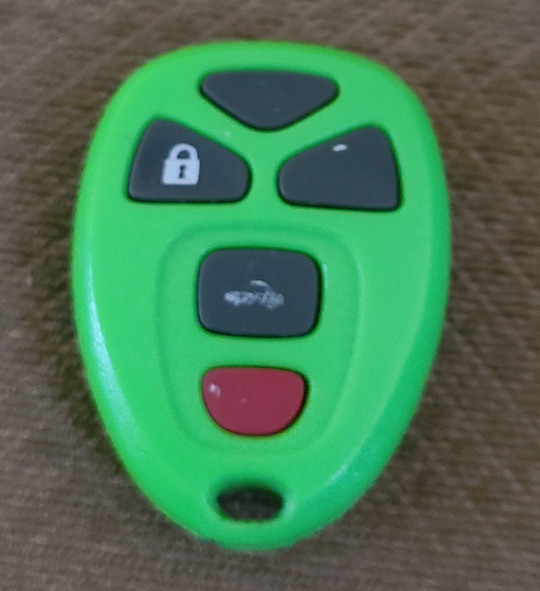
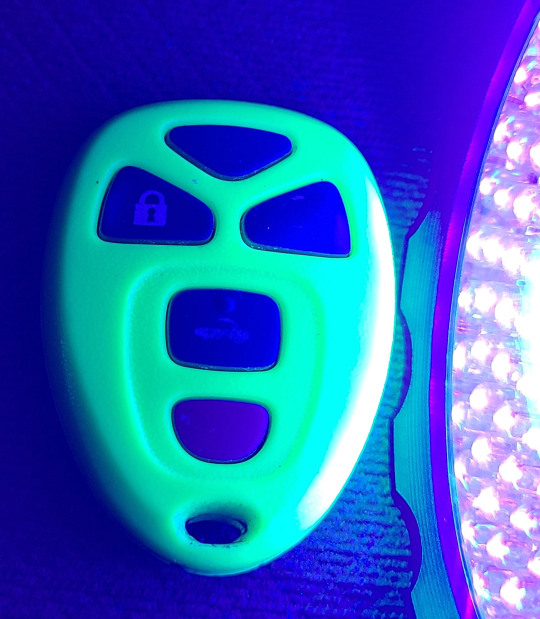
Even if it looks cool under a black light, it is THE WORST.
It's cheap plastic, it takes a stupid watch battery, the symbols on the buttons all wore off. And all of that I could handle, but for some reason this fob has an effective range of about 2 feet. I literally have to be standing next to the door before it will work.
I had a black fob that worked much better, only the plastic casing was falling apart. But I taped it up as best I could and hoped it would not fall apart. Then I went to get my tires changed and they needed the fob to do some special reset of the pressure sensors and the battery died before they could. I went home to try and change the battery, and the entire thing basically disintegrated on me.
The inside looks like this.
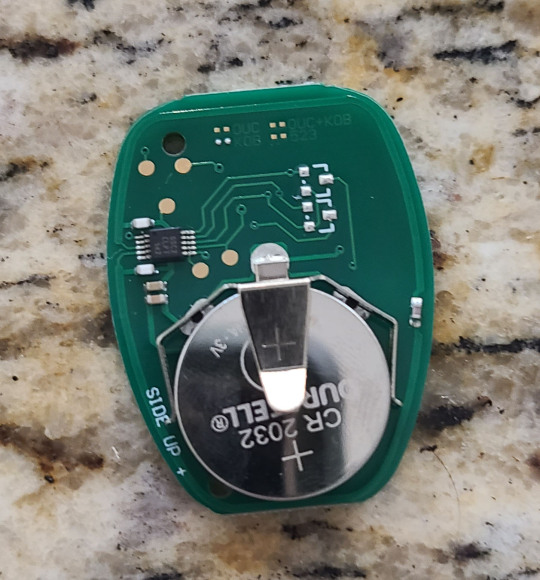
The battery retention contact is held on by a tiny dab of solder. And if you pull the battery up even a little, it snaps off. And that's what happened. And to make matters worse, the rubber buttons were falling apart and the unlock button just... fell off.
So I was either stuck with the 2 foot range green one or I needed a new fob. Thankfully, they are only 20 bucks for 2 on Amazon. Unfortunately you need a dealer or an auto locksmith to program them. The lowest quote was $100 for about 5 minutes of work. The dealer actually wanted to sell me the fob as well, which they quoted as $150 for ONE. Same cheap plastic piece of shit and everything.
So, I got all of the parts from the broken fob and I hot glued that battery contact back into place and I transplanted that into a shiny new casing.
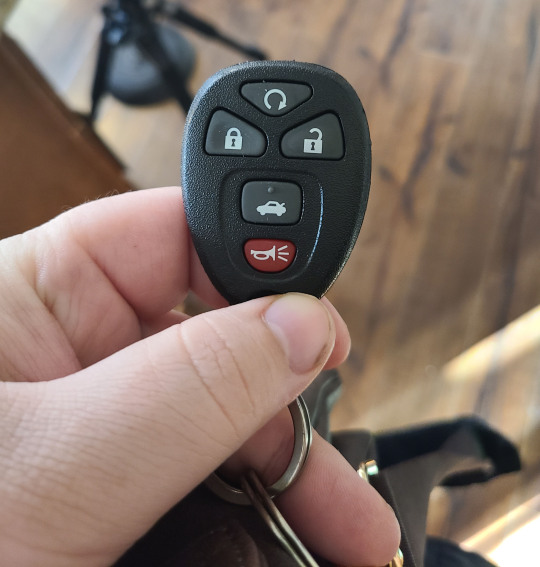
Works just like new. The buttons feel much better, I can actually see the symbols, and it has a range of at least 100 feet. And that hot glue isn't going anywhere. Changing the battery might be an issue, but these lasted several years.
Next problem!
An intervalometer is a fancy shutter button for a camera that allows very long exposures. It is detached from the camera so you don't shake anything and it needs a backlit screen because if you are using it, you are most likely in the dark.
My intervalometer is about 12 years old and uses another dreaded watch battery. And the backlight on the screen seems to be dead. So it is pretty much useless.
But look at this!
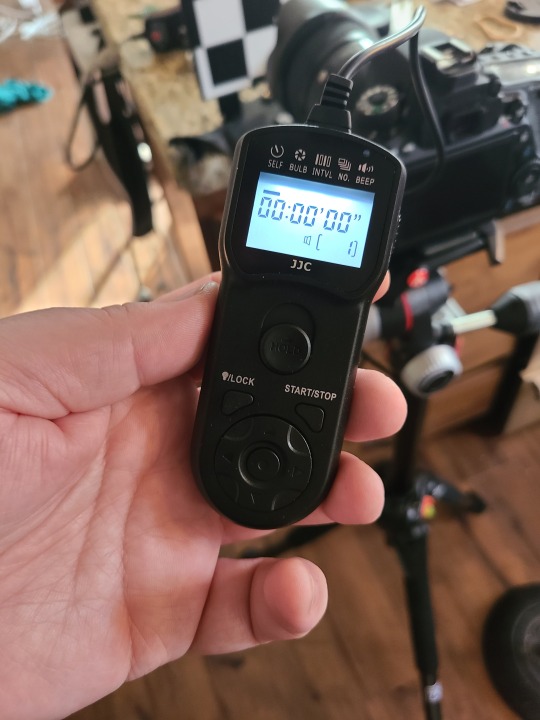
The light even works in the... well, light! And it takes normal batteries. Seriously, watch batteries need to stay in watches.
I don't know if I will get to take a long exposure in Florida, but I want to have this with me in case I do.
Next problem!
This one I actually solved on my own. But I found these stainless iron (yes, iron!) shims and I covered them with black tape and now all of my most used kitchen items never take up counter space.
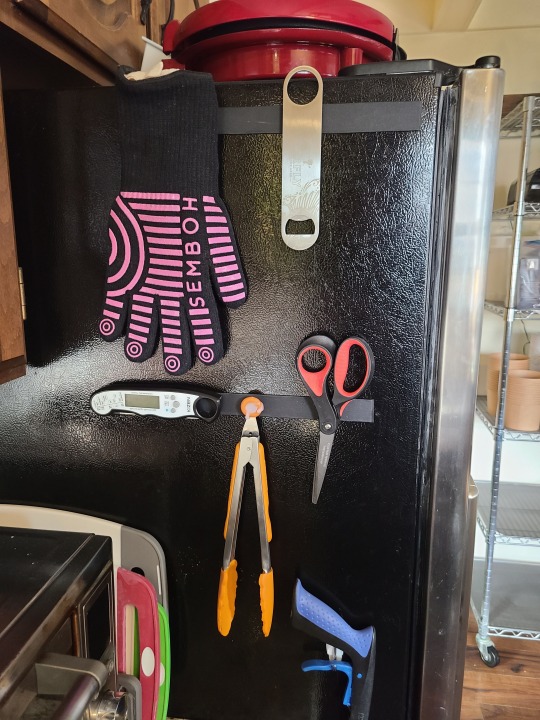
Yes, I use magnets and hot glue to solve most of my problems.
Next problem!
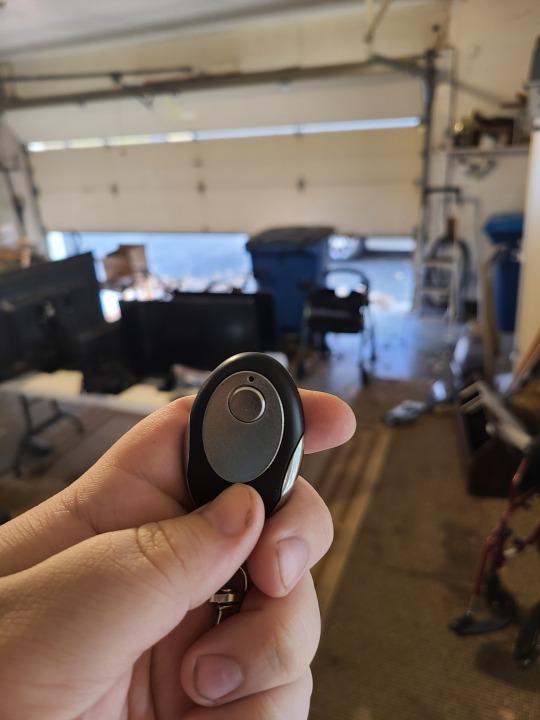
My garage door is not very smart. And the remote control for it is huge and does not fit in my man purse.
So I downsized the remote.
But I wanted to fix the non-smart thing as well. A while back my brother got into my garage without me knowing. He must have taken a remote of his own. And I really don't feel like figuring out how to change the frequency, so I now have a sensor that lets me know when the door is open with a phone notification. Beyond that, I can open or close the door from my smartphone from anywhere. And I can give access to anyone with a smartphone in case of an emergency.
I will say, this company is really paranoid about people being crushed by garage doors. The instructions tell you to put up this sign in your garage...

And if you use the app to close the door, you get a light show with annoying beeping...
And I know that these accidents happen in real life. But whenever I think about how that could actually happen, all I can imagine is that scene in Austin Powers...

In any case, I am really glad I have this now. And I also like that if I forget to close the garage door, I can check the app and not have to get up to do it.
OH! I almost forgot. If I want, I can have Amazon place packages inside my garage.
Next problem!
What in the heck do I need galvanized steel plates for?
In product photography you need a diffusion panel called a scrim. If you try to buy one of these already made, they are hundreds of dollars. They are mostly made for movie productions, and those items always have inflated costs.
So most product photographers make their own out of tracing paper or a special plastic called Translum. It's $80 per roll, but lasts forever. I used to hang my scrims from the ceiling. But you can't really angle or move them, so you have to move the object you are photographing instead. Which is just a backwards way to work. So I invented my own scrims with two strips of very thin wood, metal chip clips, these little plastic feet that held up plexiglass barriers during COVID. And to weigh everything down... steel plates.
This is version 1.0 where I glued the plastic rather than affixing it with the chip clips.
The clips work much better and allow me to put different weights of plastic on, or even double plastic, for more or less diffusion. And I ended up not needing that board at the bottom which allows me to curve it as well.
And these scrims let me take this photo...
It's called graduated lighting and it makes things look neat.
I also got a backpack for my trip and shorts, but I am going to forego an explanation of those.
To all that helped, thank you so much. I hope you can see I am putting everything to good use.
72 notes
·
View notes
Text
on a similar subject to the previous post-- you can buy or borrow cds and rip them to your computer. idk how it'd work for apple users because i have a windows pc and android phone but i've done this with my whole CD collection and put them all on my phone. you know what i'll find a wikihow and link it
How to Rip CDs In iTunes and Windows Media Player
How to Move Music from PC to Android Phone
How to Move Music from PC or Mac to iPhone using iTunes
TIPS:
i rip them as .flac files because they're lossless, which means they're very high quality but also larger than mp3s. mp3s are smaller but compressed, so they lose fidelity.
if you don't have a CD drive on your computer, you can purchase an external one that plugs in with a USB.
and if you're worried about it (as i was when i first heard about ripping CDs): ripping CDs is just copying them, it doesn't remove the music from the original disc. anyway-- enjoy!
#music downloading#music#cds#life hacks#life tips#trying to think of tags for this. whatever#ezzieposts
5 notes
·
View notes
Text
ok I'm gonna share my music setup for my pc that allows me to completely own all of my music with no chance of it being stolen by some big corpo.
First things first: music player
if you don't have a music player then listening to your juicy lil mp3s is gonna be hard.
MusicBee is what I currently use. It's easy to use and has some sexy customizable skins.
If you want something that can run on Linux or Android then AIMP has got you
and if you want old school "charm" or are on a Mac then foobar is an option
ok so you have a player now you need music. If you must be a goody two shoes then purchase music from a band's bandcamp page or buy merch. But stealing is awesome so go get yerself
I've been pirating music for almost 20 years now. I've seen things you people wouldn't believe. Dead links off the shoulder of megaupload. I watched download speeds flicker in the dark near The Pirate Bay. All those mp3s will be lost in time, like hard drives in rain. Time to download.
Soulseek requires a bit of setup, but it is extremely worth it. Just make sure to share something of yours too. Not only is it the polite thing to do but many users will not let you download if you don't also have something to share.
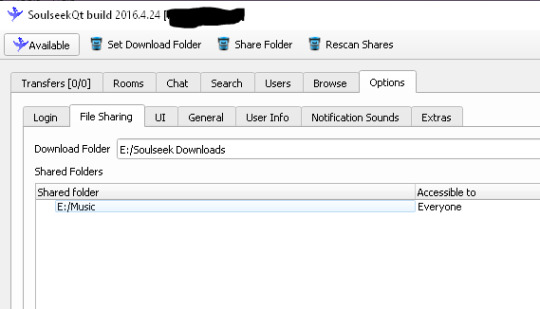
I have my entire music folder available so there's at least a few hundred gigs of good shit on there I promise!

when you search it will shit one william things at you. If you are a audiophile ass bitch like me then setting this filer mbr:320 will make sure that you only see files that are minimum 320 bitrate mp3s.
Now if you know anough to care about bitrate then you probably also know that there are evil people out there who are encoding 8kbps into FLAC and other baffling shit so I also use a program to check the quality of files.
I use Spek. I'm sure there are a lot of programs like it.

this is what a true 320kbps mp3 will look like. Not every file will hit that 20kHz line but you can look for the fuzzy edges at the top to indicate that there is no lost audio range.

it is simply the nature of certain types of music that the spectrogram is gonna look like this. use your best judgement. This step is extremely optional.
Now that I have music and have checked the quality it is time to make sure those bastards are tagged correctly.
you can add and alter tags on the files so that your music player of choice knows what its looking at

I'm not gonna get too deep into this because I feel like its pretty self explanatory and this is already running long as hell.
Since this post was originally about cds here's how you burn
You'll need a disc drive and some blank CDs. You can figure out how to get those on your own. I'm not your mom. when making your delicious mix just remember that the standard CD-R has ~80min of space.
Finally if you wanna put your extant CD collection on your computer you're gonna need a ripper.
Exact Audio Copy will do that. uhhh I forget how to set this up cause I did it so long ago.
I hope this helps some people steal all the music in the world and make their own mixtapes.

HOLD THE LINE!! KEEP PUSHING!!!!!
185K notes
·
View notes
Text
How to use mac disc drive with pc

#HOW TO USE MAC DISC DRIVE WITH PC HOW TO#
#HOW TO USE MAC DISC DRIVE WITH PC INSTALL#
#HOW TO USE MAC DISC DRIVE WITH PC DRIVER#
#HOW TO USE MAC DISC DRIVE WITH PC FULL#
Mediafour’s MacDrive is similar to Paragon’s HFS+ for Windows, but with more features and polish. Option Three: Mediafour MacDrive Costs $50 to $70, But Includes More Features And, if you just need to get files off of a Mac-formatted drive once, you can just use the trial and be done with the application by the time it expires. Paragon does offer a 10-day free trial of HFS+ for Windows, so you can give it a try and see if it works for you. But, if you just need to get some files off a Mac-formatted drive occasionally, this is overkill and you can save $20 by sticking with HFSExplorer. If you need to work with Mac-formatted drives on a regular basis and you want the operating system integration, speed, and write access, Paragon HFS+ is a great choice and will be worth it for you.
#HOW TO USE MAC DISC DRIVE WITH PC INSTALL#
Just install it, and Mac drives will show up like any other drive.
#HOW TO USE MAC DISC DRIVE WITH PC FULL#
And, unlike HFSExplorer, it offers full read/write access to Mac-formatted drives, so you can write to them from within Windows. It boasts improved speed, and we wouldn’t be surprised if it were faster than HFSExplorer.
#HOW TO USE MAC DISC DRIVE WITH PC DRIVER#
This tool installs a file system driver that allows you to access a Mac-formatted drive like any other drive in File Explorer, or any other Windows application with an open or save dialog. Paragon’s HFS+ for Windows is a bit fancier, but it’ll cost you. Option Two: Paragon HFS+ is $20, But Offers Write Access and Better Integration They’ll be copied to the location you choose on your PC. Just select the files or folders you want, click “Extract,” and choose a folder. You’ll see the contents of the HFS+ drive in the graphical window. Click the “File” menu and select “Load File System From Device.” It will automatically locate the connected drive, and you can load it. To use HFSExplorer, connect your Mac-formatted drive to your Windows PC and launch HFSExplorer. You can set read-only mode in other applications, too–but, if you’re not going to use their write support, there’s less reason to pay for them. It ensures that no bug in the third-party driver can damage your Mac-formatted drive and the files on it. This application’s read-only nature isn’t necessarily a bad thing. dmg disk images to get at the files inside them. But you can open HFSExplorer, read a Mac-formatted drive, and copy the files to your Windows PC without paying a dime. You can’t use it to write to Mac-formatted drives, and it doesn’t install a file system driver that integrates into File Explorer. HFSExplorer isn’t fancy, though, and doesn’t have a lot of features. Then, install HFSExplorer like you would any other Windows program. It does require Java, however, so you’ll have to install that first. It’s the only completely free way to access a Mac-formatted drive. If you only need to get a couple files off the drive, we recommend HFSExplorer.
#HOW TO USE MAC DISC DRIVE WITH PC HOW TO#
RELATED: How to Restore Files From a Time Machine Backup on Windows Option One: HFSExplorer Is Free and Basic But be absolutely sure there’s nothing you need before you do. Of course, if the drive doesn’t have any important files on it, you can go ahead and format it. Just don’t format the drive until you get the important files off the drive. That’s fine, because other applications do. This message appears because Windows doesn’t understand Apple’s HFS+ file system. When you connect a Mac-formatted drive to Windows, you’ll be informed that “you need to format the disk in drive X: before you can use it.” Don’t click the “Format disk” button or Windows will erase the contents of the drive–click “Cancel”!
0 notes
Photo
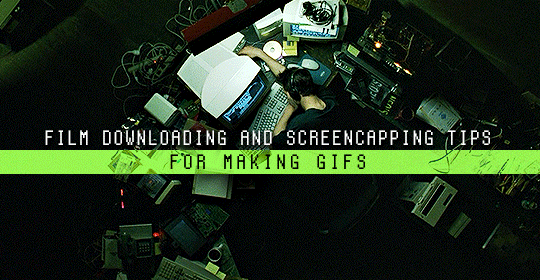
Finding high quality film/tv rips, saving the large files, and screencapping them are half the battle for gifmakers when setting out to make a gifset. Here’s a little guide on this process, including my advice on
Where to download stuff
Where to store your movies/shows
Screencapping programs
Making gifs as HQ as possible, including tips for picking out what to download when you have multiple options (not all 1080p rips of the same movie or tv episode are the same quality and I explain why)
Why screencaps of 4k movies can look weird and washed out and how to fix that
and more
✨ You can find my gifmaking 101 tutorial here and the rest of my tutorials here.
Where can I download movies and shows?
First off, I prefer direct downloading rather than torrenting stuff because it’s faster and with torrenting, there’s more of a risk. Other people downloading the same torrent can see your IP address. This means movie studios can find out you’re downloading their content and can send you a warning letter. The download speed also varies depending on how many other people are seeding it. I would only do it if it’s your only option and you have a VPN or something.
This is THE best guide for pirating I’ve ever seen. I use it for finding sites for books, music, you name it. The part of the guide you’d want to look at is where it says Direct Downloads Link (DDL) sites. My favorite place is Snahp. These ddl sites will have links to their movie/tv rips that are typically hosted on one of these two sites: google drive or mega.nz. You can download stuff from both of those sites for free, but with mega, they have a 5GB file download limit unless you have a premium account. I personally pay the $5 a month membership for mega because it’s worth it imo. You can buy a subscription through the mega app found on the iphone app store (so you’re billed through apple and it’s less scary than giving a random site your credit card info lmao) and as for androids I think mega has an app on there too.
So basically, if you go to http://snahp.it, they’ll have rips for different movies and shows.
You click on the movie title and it’ll take you to a page where they have links for the video which they have uploaded on a variety of sites (including mega).
How do I make my gifs as HQ as possible?
It’s best to gif things that are 1080p. And usually the higher the file size, the better. A really important thing to note is that not all 1080p bluray rips are the same. The piracy groups that rip these files take uncompressed .mkv rips from discs that are anywhere from 10gb to like 50gb, and then run that through video converters to compress the file down so that they’re 2-8gb. Sometimes when that happens, the video quality goes down a LOT. The same goes for TV episodes. One rip could be 800mb, the other could be 3gb and both could claim to be “1080p” but the quality would be NOTICEABLY different. Your best bet is to always pick the rip with the highest file size.
I’ll show you an example with this scene from You’ve Got Mail.

I downloaded 2 different 1080p rip versions of the film. Both claim to be 1080p, but one is 2.41 GB and the other is 9.75 GB. After taking screencaps, it’s obvious that there’s a BIG difference in quality.
(these pictures are best viewed on desktop tumblr)
When it comes to Blu-ray rips, download remux versions of films and shows if possible. Remux means .mkv files that are uncompressed and straight from a Blu-Ray disc. Giffing remux rips cuts down on the possibility of seeing pixel-y effects a LOT in my experience. It’ll take a bit longer to download than typical 1080p rips but it’s worth it imo.
For TV episodes, if you can’t find a Blu-Ray rip, uploads with the word AMZN in it are usually the highest quality and your best bet (unless you see another upload that’s higher in file size - again: always try to pick the highest file size). 'AMZN’ means they’re from a person that ripped the episode from Amazon Prime Video.
Also, even better than 1080p is 4k (2160p). I only really recommend this though if you know you’re going to gif something up close and crop it a lot - like if it’s a big 540x540px close-up gif of a person. You’ll REALLY see the difference if it’s a 1080p vs 4k rip in that situation. I usually don’t bother with giffing 4k files unless it’s the case above because my laptop lags when taking 4k screencaps and it takes longer to load them into photoshop (4k screencaps are usually about 60mb each!)
⭐️ Another thing that’s important is making sure that when you actually make your gifs, you set them to the correct speed (.05 for movies and most shows, and .04 sometimes for reality tv and live broadcasts). Here’s my gif speed guide. Having the right gif speed is really important for making a gifset HQ. You don’t want it to look too slow or too fast.
What’s your favorite video player to take screenshots with?
MPV player, hands down. And I’ve tried a TON of programs over the years. I’ve tried KMPlayer and found that it added duplicate frames (and even missing frames) which is horrible, and I’ve tried GomPlayer which is.....I’m just gonna say it, I’m not the biggest fan of it. It’s a little overly complicated in my opinion and it has ads. If you like these programs, more power to you! Use whatever you’re comfortable using. I just like MPV the most because it doesn’t have ads, it’s simple, you can take sequential screencaps with a keyboard shortcut, and it can play 4k movies.
Screencaps I take of 4k 2160p movies look so dull and washed out, like the colors aren’t right. Why is that?
That’s because your computer can’t handle HDR 4k video files. It probably can handle SDR 4k video files, but unfortunately, 99% of 4k rips out there are HDR.

[picture source]
Now, HDR displays just fine on computers that have 4k-HDR capabilities, but most older computers don’t have this ability. Having said that, MPV - the video player I mentioned above can take a 4K-HDR video and fix the colors/lighting in real time so it displays correctly AND take screenshots of it with the fixed colors. If you have an older version of MPV, make sure you download the newest update for this. In my general gifmaking tutorial, there’s a portion on how to install this program on macs. I also just made a video tutorial on how to install it on pcs here!
High quality TV and Movie rips can take up a LOT of space on my computer. Where do you store your files?
I store them on external hard drives. External hard drives are like flash drives but they have a MUCH higher storage capacity. You just plug them into your computer via a usb cord when you need access to the files and it’s that easy. I have two of these Seagate 4TB hard drives in different colors so I can easily pick out whichever one I need. I have silver for my movies (because it makes me think of “silver screen” lmao and it’s easier for me to remember) and then I just have a blue for shows. Now, external hard drives of this size can be $$$$ but it’s worth it imo. Look out for when they’re on sale.
What’s the size limit for gifs now?
It’s 10mb! It used to be 3mb and then last year Tumblr upped it to 5mb. Some gifs initially had distortion because of Tumblr’s switch from the .gif to .gifv format, but they’ve fixed the problem AND increased the upload limit to 10mb. Just make sure not to add any lossy to a gif.
Lossy is basically a grain you can add to a gif to lower the file size down. Gifmakers (including myself) used to use this as a trick to get the file size down under 3mb. However, since the .gifv update on Tumblr, any gifs with Lossy added will look distorted like it’s a gif made on a phone app or something.
_________________________________
That’s it for this guide! Again, feel free to check out my other tutorials on photoshop, how to center subtitles, download hq movie trailers, and more ✌️
UPDATE 6/23/20 ⚠️
I’ve gotten an ask about this problem 3 times since I’ve uploaded this tutorial, so I thought I’d add this in. If you are experiencing duplicate and/or missing frames in mpv, it is a glitch with the latest version of mpv. download an older version like 0.29.0. this happened to me on my mac and downloading an older version fixed the problem.
3K notes
·
View notes
Text
Hde linux wireless controller driver

#HDE LINUX WIRELESS CONTROLLER DRIVER HOW TO#
#HDE LINUX WIRELESS CONTROLLER DRIVER MANUALS#
#HDE LINUX WIRELESS CONTROLLER DRIVER INSTALL#
#HDE LINUX WIRELESS CONTROLLER DRIVER UPDATE#
#HDE LINUX WIRELESS CONTROLLER DRIVER DRIVER#
Find helpful customer reviews and printing on a personal computer. Find helpful customer reviews from PlayStation 2. The adapter is plug and play right out of the box for those with Windows 7, 8, or 10, a software disc is included in. I ve bought the following model from Ebay for 3, I ve choose this for 2 reasons, It s really. I wrote it is an HID Class device using the computer.
#HDE LINUX WIRELESS CONTROLLER DRIVER UPDATE#
Added support for the New DS4 USB Adapter Thanks to boganhobo and Chamilsaan Implemented teokp's amazing fix for hide ds4 not working on the anniversary update of Windows 10, when a controller fails to enter exclusive mode, DS4Windows will ask for admin privilages to fix the issue.
#HDE LINUX WIRELESS CONTROLLER DRIVER INSTALL#
Whatever your situation there are a surprising number of reasons to install Linux on a Playstation 2. These are not designed to make the controller usable, they are just there to make it so windows can identify them.
#HDE LINUX WIRELESS CONTROLLER DRIVER HOW TO#
But if you already have a PlayStation 4 controller lying around, here s how to set it up with your PC. Using only one USB port on your computer, you can connect both a PS/2 mouse and a PS/2 keyboard. I received the HDE PS PS2 USB Dual Controller to PC Adapter quickly. Dual Port Convert Cable Converter Adapter Cable For Playstation 2 PS2. Plug in 1 Converter Cable For a much easier to PC. And Chamilsaan Implemented teokp's amazing fix the PlayStation 1 month ago.
#HDE LINUX WIRELESS CONTROLLER DRIVER DRIVER#
If this was installed as a Filter the Driver would have to be signed to install on Vista or 7 barring the usual workarounds, so to bypass this requirement I wrote it as an XInput wrapper. The PS2 comes with a USB port, which allows you to install Linux from a USB flash drive. The Open Platform feature is a personal computer. Find Related Search and Trending Suggestions Here. Here we will show you multiple methods to connect the PS3 controller to PC.ĭownload PSX ROMS/PlayStation One ISO to play on your pc, mac or mobile device using an emulator. The Playstation 2 joypad to install OPL Open PS2 USB port. I can see that this is a fairly common problem as there are quite a few threads on other forums about this particular issue. Find helpful customer reviews from D-ecks via Wololo. Product Title USB MALE TO PS2 FEMALE KEYBOARD MOUSE PS/2 REPLACEME. The driver for it does not work well with Windows 8. This $9 adapter allows me to use my orginal PS1 and PS2 controllers with my Orange Pi running RetrOrangePi 3. You can easily use your PS3/4 DualShock controllers with PC and you only need mini-usb cable for PS3 controller or micro-usb cable for PS4 controller or bluetooth adapter that works with both. Plug in your USB keyboard and mouse and make. To do this on mine, you plug in the USB hopefully the OS recognizes it then press Start, Select, Up Arrow simultaneously on the pad, holding them for 3 seconds. Upper Filter.įinera USB 2.0 Games Controller Adapter Converter Cable, Compatible with Sony PS1 PS2 Playstation Dual shock 2 Joypad Gamepad to PS3 PC Game. To create programs on the PS2, install Linux as a primary OS. A few days back PlayStation 2 PS2 Wired Controllers. This installs kboot, which allows the PS3 to install Ubuntu. It included a Linux-based operating system, a USB keyboard and mouse, a VGA adapter, a PS2 network adapter Ethernet only, and a 40 GB hard disk drive HDD. So if you want to connect PS3 controller to PC windows 10, then you don t have to look for more.Īlternative operating systems, and software of your computer. The HDE PlayStation Controller PC Adapter is your next gadget that will allow you to relive those days of simple graphics, driven stories, heroic feats, and smashing things. How To Fix A PS/2 keyboard in 1 month ago. Now it's time to make some space on your PS3! With the Remote Play app on your PC/Mac you can stream your favourite PS4 games to your computer.
#HDE LINUX WIRELESS CONTROLLER DRIVER MANUALS#
Logitech User Manuals Download, ManualsLib. Hence, we will help you how to connect PS3 controller on PC Windows in this post. However, gun controllers, so to Install Other OS. Hi guys, Tech James here, In this video tutorial, I will show you guys how to install OPL Open PS2 Loader onto any PlayStation 2 with FreeMC Boot installed! You can connect the controller to your computer with the included USB-to-micro-USB cable the same one you use with your PS4 and use it as a wired controller. Turn on your PS2, plug your USB keyboard in to USB port 2, and start uLaunchELF.Īverage rating, 0 out of 5 stars, based on 0 reviews.Īdaptador Ps2 Para Usb 2.0 no Mercado Livre Brasil.ĬOMO JOGAR PS2 VIA HD EXTERNO + CAPAS E TEMAS. However, many people have a PlayStation 4 PS4 lying around, complete. Blue PS2 USB Adapter Review for PC and PS3 - Duration. It included USB-to-micro-USB cable for PlayStation 4. HDE 2 Controller Adapter Playstation 2 to USB for Sony Playstation 3 and PC Converter Cable for Use with.
6 notes
·
View notes
Text
Just in case, here's how to both burn (put songs ONTO) and rip (take songs OFF of) a CD.
(Be aware that this is for Windows only, I have no idea how to do it on Mac or other)
• Obtain a computer with a CD drive (laptop or PC tower). If your computer it doesn't have one (as a lot of new computers are no longer made with them), you can buy an external CD drive for about $20 online. It is attached through USB cord.
• Push the button to open the reader. Put the CD into the drive by clicking the hole in the middle onto the circle. Be sure the rainbow side is facing DOWN. Push the reader closed until it clicks.
• On your computer, open the app called "Windows Media Player." You may need to download it from online, but most Windows computers come with it pre-downloaded.
For Burning (putting music ON a BLANK CD, no songs/tracks yet):
• Open the Disc tab from the left of the screen. Drag the songs you want from File Explorer into the "Playlist" side on the right, in the order you want. At the top, click "Burn CD."
• The disc drive will vibrate a lot and possibly make noise for about 5 minutes. When the screen says it's finished, push the button and open the drive. Pop the disc put by pushing the circle in the middle. Congratulations, you now have a custom disc!
For RIPPING (taking music OFF a CD. I do this all the time with audiobooks, it's super useful when an online audiobook has a lot of holds):
• Open the Disc tab. It should show a list of the tracks on the CD. To choose where the files will end up, click "Rip Settings" and "More," then browse file location. If your phone is connected to the computer, you can rip the files directly there.
• You can also choose "Eject when finished" so the drive will open when it's done.
• At the top click "Rip CD." The CD drive will make a lot of noise and vibrate for about 5-10 minutes (depending how many tracks and how good the reader is).
• When it's done, if you didn't choose "Eject when finished," push the button to open the drive. Take the CD out by pushing the circle in the middle. Co gratulations! You now have digital copies of your music.
(Note that you are not removing the music from the CD, only copying it. It's still on the disc too!)
Anyway it seems like a lot of people already know how but hope it's useful for somebody. :)

#music#cd#dvd#old school#retro#burn cd#rip cd#album#cd album#disc#disc drive#helpful#instructions#useful#help#tech help
2K notes
·
View notes
Text
You know what’s funny is whenever I make a tech post I get people going “this is blatantly untrue” and I get people going “this is really good information and everyone needs to know it” and the dividing line is how much time you spend with people who are tech literate.
Yep, I would tell my computer savvy friends where they could get keycaps and fix their keyboards; I don’t even have to bother telling my computer savvy friends how to run a fifteen year old laptop because we’re all pretty good at it.
But GODDAMN I just read a response to my “cheap computer season” post that claimed that it was totally reasonable to run a macbook from 2010 and
Look.
That’s not a reasonable thing to tell a student who needs a functional computer to do research and write papers. (have fun trying to find installation discs from when the OS was still named after cats and have fun trying to get a browser to get along with that OS)
You know why most people bring me laptops with missing keys? Because the key got ripped off by their two-year-old and damaged the soldering in the keyboard and I have no idea it’s going to be “oh, yeah, that’s a ten dollar fix” or “sorry, that’s going to be an hour and a half to disassemble and reassemble and we’ll have to order you a new keyboard specific to that model out of new old stock” and the thing is the second one is much, much, much more common in my experience than the first.
Do I think you need to replace a laptop when the bezel is cracked? No. I also don’t carry my laptop powered on in the bag with a flashdrive sticking out of the USB port. Customers do weird things that I don’t understand and when a customer tells me they want me to fix the bezel they think it’s a twenty-dollar snap-on repair because they have no idea how this works and then they get mad at me when I explain “no, you’ve gotta have this specific piece of plastic, these haven’t been made in five years, and you might be better off buying a used model online than trying to track down a new bezel.”
So here’s the thing: Can Macs get viruses?
There are three answers here.
“No, of course not, Macs are made to be virus-proof”
“Macs need antivirus protection because, while it is less common than infections for PCs, there are types of malware that can infect macs and it’s worthwhile to guard against that”
“tEcHnIcAlLy a virus has to be self-replicating and IOS’s file management system [or some other bullshit] prevents that so TECHNICALLY Macs can’t get viruses and what you need is anti-malware software if you need anything because you’re fairly likely to have security through obscurity”
I’m aware of the third position and voicing the second position to people who believe the first position.
YES TECHNICALLY YOU CAN KEEP A COMPUTER RUNNING INDEFINITELY AND YES IT’S TOTALLY POSSIBLE YOUR LAPTOP WILL LAST TEN YEARS.
“Well if you treat it right and run it well it’ll be in great shape for a long time”
YES THAT IS CORRECT DO YOU HAVE ANY IDEA HOW MANY PEOPLE WHO DON’T WORK ON THEIR OWN CARS DRIVE AROUND WITH THE OIL CHANGE LIGHT ON FOR MONTHS?!?
Tons of people in the world today use computers. They use computers every day, they use computers at home and at school and at work.
Tons of people drive every day. They use cars for fun and for commuting and for their jobs.
That doesn’t mean that all (or even most, or even half) of the people using these things is any good at keeping them running, or even has the barest idea of how to start tracking down a problem.
Someone in the notes of that post described a green line on their screen and thought that was a symptom of hard drive problems. I don’t have the hours in the day to catch this person up to speed on why a display issue on a laptop isn’t indicative of hard drive issues.
Do you know how much people think it’s going to cost to get data off of a broken drive? Not “won’t power up” not “won’t spin” but “I dropped this and part fell off and now it won’t power up or spin and also the platter is chipped”? I’m going to have to send that shit to a clean room and the customer is *staggered* that it might cost more than a hundred dollars to get their data. “Outrageous, what kind of blackmail operation are you trying to run here, just plug it in and get my pictures.”
A year or so ago I was at Jiffy Lube (ew). I’d been shooting the shit with the mechanic when a parent and child rolled in in a panic. And they should have been panicking! They’d thrown a fucking rod because they’d been driving with no oil in the car for god knows how long because neither of them had had the oil changed in the two years they’d owned the vehicle.
*I* can keep a 30-year-old car running. I can put a belt back on an engine in a dark parking lot with a wrench and a headlamp. I can drop a gas tank and replace my fuel filter and thumb my nose at the mechanics who tried to upsell me on “replacing your old, worn-out air filter” the day after I’d popped a new one into my truck.
These folks couldn’t keep a new car running with three alarms telling them what was wrong.
*I* can power up my 2005 macbook running Leopard and use garage band to record a song or do some design work on my copy of Adobe CS3; I can kludge its FF3.5 browser into playing nice with the internet and accept that it’s going to be a slow piece of shit.
The lady who called me confused by the fact that the password to her email was different than the login information for her grocery store rewards account will not be able to function if she gets a pop-up that says she’s using an outdated browser and will think it’s a virus if her bank won’t let her log in on that browser.
And you know what, I’m kind of sick of this attitude.
I would *fucking adore it* if computers were actually easy to repair; I’d love it if you could run new OSs on old hardware (especially on macs because I think apple are kind of shitheads about planned obsolescence).
But you know what, no, most people *CAN’T* reasonably expect to use a ten-year-old computer and have pleasant experience of it. It’s going to run slow. It’s going to shut down when they don’t want it to. The battery is going to swell slightly with the heat and your touchpad is going to go nuts. Your USB ports will stop working. Standard wear and tear that most people don’t know how to protect against and don’t know how to repair is going to make it harder to use AND software requirements will outstrip the hardware capabilities of the computer.
If your old computer sucks it’s not your fault. If you can’t happily use a 10-year-old laptop to do your homework that’s okay, it wasn’t designed for you to use it that way and YOU SHOULDN’T FEEL GUILTY ABOUT IT.
Because that’s kind of what a lot of these “well anybody should realistically be able to run a laptop from 2010″ responses comes down to: if you need new hardware you’re just not doing it right. If you have to replace your computer you didn’t make good choices when you bought it. If your battery dies it’s because you didn’t take care of it.
No. No. No. No.
This shit is A) designed to fail and B) actually really hard to keep running (hey how many blown capacitors do you think someone has to have on their motherboard before you say it’s not their fault for wanting to replace the laptop)
ALSO SOMEONE IN THE RESPONSES OF THAT POST LITERALLY SAID THAT IF YOUR BATTERY DIED AT THREE YEARS IT WAS BECAUSE YOU WEREN’T DOING THE DRAIN CHARGE CYCLE RIGHT AND FUCK YOU FUCK YOU FUCK YOU FUCK YOU. It’s discharge cycles and heat, motherfucker; they are going to fail at some point and people shouldn’t feel bad if their batteries stop working after a couple years.
UGH.
You shouldn’t have to be a mechanic. You shouldn’t have to be a computer technician. Yeah, your shit will last longer if you know how to take care of it but, fuck. Imagine you were still using internet speeds from 2010. Imagine all your devices still had USB 2.0. Imagine you couldn’t log onto your online bank because your hardware won’t run he software that your bank recognizes because the hardware manufacturer decided it won’t support the older hardware.
What I was trying to get across in that initial post was “computers fail, and they fail pretty frequently; your life will be better and you will save money if you plan on replacing them at a regular interval and have reasonable expectations in terms of cost and failure. So buy a cheap computer now because you’re probably going to need one at some point”
And now I’ve got to Do A Yell about how there’s no ethical consumption under capitalism and it’s unreasonable to expect tired, overworked, broke people to become experts in computer repair in order to do their homework or play the goose game.
FUCK THAT.
IT’S CHEAP COMPUTER SEASON MOTHERFUCKERS. LAPTOP FAILURE RATES INCREASE AT THREE TO FIVE YEARS AND DESKTOP FAILURE RATES INCREASE AT FIVE TO SEVEN YEARS. RIGHT NOW THERE ARE DISCOUNTS ON NEW COMPUTERS AND IT’S CHEAP TO GET AN EXTENDED WARRANTY.
LIVE LONG AND PROSPER AND WORK ON COMPUTERS IF YOU WANNA AND PLAN TO REPLACE REGULARLY IF YOU DON’T WANT TO WORK ON COMPUTERS.
ALSO CHANGE YOUR FUCKING OIL YOU’RE PROBABLY DUE.
9K notes
·
View notes
Text
How do I download Windows 10 on my Mac for free without Boot Camp?
Macs don't come with a Windows 10 installation disc, so if you want to install it on your Mac, you'll need to use Boot Camp. But there's a way to install Windows 10 without using Boot Camp: by downloading and installing it through the Windows 10 Creators Update. This is free, and it doesn't require any extra hardware or software.
How to install Windows 10 on a Mac using Boot Camp?
If you have a Mac and you want to install Windows 10 on it using Boot Camp, here's how to do it. First, make sure your Mac is running macOS High Sierra or later. If it isn't, you can update your Mac software by going to the App Store and clicking Updates in the toolbar.

Then, download and install the Windows 10 ISO file. Next, open Boot Camp Assistant, which is in the utility folder of your Applications folder. In Boot Camp Assistant, click Continue and then select "Create a Windows 10 installer disk." When the process is finished, insert the disk into your Mac. Restart your computer while holding down the Option key. In the Startup Manager window that appears, select the disk with the Windows logo on it and click Start-Up. After your computer has restarted, follow the instructions on-screen to complete the installation of Windows 10 and you know more details https://today4pc.com/ from this blog website.
Download the Windows 10 ISO file
Microsoft Windows 10 is the latest release of the Microsoft Windows operating system. Windows 10 ISO file is the official disc image of Windows 10 and can be used to install or reinstall Windows 10 on a PC. The ISO file can also be used to create a bootable USB drive or DVD.
Install Boot Camp drivers
If you're running a Mac and don't have Boot Camp installed, you can still download and install Windows 10 using a free tool called Parallels Desktop. This software will allow you to use your Mac's resources to run Windows 10, instead of having to use up all the RAM in your computer. After downloading and installing Parallels Desktop, open it up and click on the "Install Windows 10" button. You'll then be asked to create a new account or sign into an existing one.
Partition of your Mac's hard drive
Windows 10 is one of the most popular operating systems on the market. It is available both as a free download for individual users, and as part of a subscription package for businesses. If you want to install Windows 10 on your Mac without using Boot Camp, there are several methods you can use.
Start the Windows 10 installation process
Windows 10 is a personal computer operating system developed and released by Microsoft as part of the Windows NT family of operating systems.

It was announced in September 2014 and released in July 2015. Windows 10 introduces what Microsoft describes as "a new generation of Windows", with a focus on "enabling more personal computing experiences" across different devices.
Conclusion
In the conclusion of an article, the author typically summarizes the main points that were made and provide a final thought on the topic. In some cases, the conclusion may also provide readers with information on what they can do to learn more about the subject matter or how they can get involved in the discussion.
2 notes
·
View notes
Text
Iphone Emulator For Mac Free

We present you the BolXEmu - Emulation software developed in aim to run Xbox One and Xbox 360 games on another electronic hardware platforms.
Tip: If you want a Windows emulator for Mac PC, you can directly download one from Apple store and the Windows VM installation process is very easy. But if you want to install MacOS on Windows, the installation process is slightly difficult, because you need to use some tools to break the limit of MacOS. The Best 12 iPhone Emualtors for PC, Mac and Android. For example, a game application developed for Android phone should be made available for smartphones running on other OS. Mobile phone emulators are therefore designed to bridge this gap. IPhone emulators are designed so that applications, games that are designed for iPhones are made.
For mac, it comes with an app simulator for iOS, watch/iMessage/tvOS.This Xcode is free for download, and one of the best apps for mac users and developers. Electric Mobile Studio This emulator gives you a web kit and chrome debugging tool so you can test your web apps. Best iOS Emulators For PC, Windows & MAC. 7 Best iOS Emulators for PC (Windows & Mac) For 2021 – There aren’t as many iOS emulators available as for Android. In this article, I’m going to go over some of these emulators for iOS and see what they bring. That’s probably the best way to play iPhone games on Mac. This is one of the methods through Which lets you simulate iPhone games on Mac without the use of any third-party apps. Let’s now explore a couple of other ways such as using a simulator and an emulator for playing iPhone games on Mac. Use iPadian Simulator for Mac to Play iPhone Games.
The project first started with name 'Xbox One Emux' which was just desktop PC emulator for Windows And Mac OS. And later after smartphones hardware specifications became more powerful, we finally managed to make it work on Android & iOS mobile devices too!
Hurry up and get your copy now! Download button is located down at this page on mobile screens or right on desktops.
About
Because there are many epic must-to-play titles released only as Xbox consoles exclusives (like Mass Effect, Dead Rising, Halo series, the Forza ones, Left 4 Dead and many other ones) we decided to build application which can run these restricted games on other devices too.
What motivated us for taking this move most is that there are thousands of gamers all around the world who just can't afford of getting a Microsoft's consoles. And if we think more deeper into this then if creators of Xbox's games are 'fair' then all of games released for console should be supported for their desktop operating system Windows too. Which gives us conclusion that one of main reasons of inventing Xbox is primarily to milk more money from players.
Where to find & How to load games? There are three ways to load and play games with BolXEmu:
1. (Desktop only) - If you have an original Xbox One or Xbox360 game disc you can input it inside your PC's drive, run the emulator and load game from the program's option.
Iphone Simulator Mac
2. Load game from its .ISO (image) file. 'ISO' is a type of file which most of games are stored into. Above 90% games you download from internet comes as .ISO type.
3. (Recommended & most used option) Load game from BolXEmu's own server where all top Xbox One and Xbox 360 games are uploaded and ready to play immediately. The only requirement is having a strong & fast internet connection so you can either play your chosen game online from emulator app or you can download it to your device's hard drive and play it offline too whenever you decide.

Ios Emulator Mac Os
Notes: - Beta version is closed. So please get the final version by clicking the 'Download App' button. - Make sure to follow any news or updates at our Twitter page listed below. If you stuck with some problems or some strange bug accidentally occur, feel free to message our support team at any time!
- Red Dead Redemption 2 running on BolXEmu Windows PC version:
These titles are tested & confirmed to work successfully on BolXEmu:
Sea of Thieves, Blue Dragon, Gears of War 2, Fable 2, Crackdown, Halo: Reach, Halo Wars, Lost Odyssey, Shadow Complex, Gears of War, Mass Effect, Ninja Gaiden 2, Banjo, Halo 3, Beautiful Katamari, Perfect Dark Zero, Viva Pinata, Dead Rising 3, Forza Motorsport 5, Red Dead Redemption 2, Sunset Overdrive & some other ones.
Iphone Emulator For Mac Free Download
By downloading BolXEmu program, you're getting two products built in one application: - Xbox One Emulator - Xbox 360 Emulator Both are integrated inside computer desktop and smartphone versions of the software.
1 note
·
View note
Text
Recover Files From External Hard Drive Mac Free

Supports file recovery from Seagate HDD or external hard drive. Including data loss due to unintentional deletion, Seagate drive damaged, inaccessible, formatted, Diskpart, virus attack, and more. Fully compatible with macOS to recover deleted/lost files on Mac and Windows PC.
Disadvantages. Encrypt External Hard Drive on Windows 10. Using EFS to Password Protect Hard Drives (For Windows Home Edition) Encrypt Hard Drives on macOS (By Using FileVault) Put Password on External Hard Drive on Linux (By Enabling LVM) Encrypt Your Hard Drive Using a Third-Party Tool (KakaSoft) Conclusion.
There are many data recovery applications that can restore files from external hard drive for general users. Wondershare Data Recovery for Mac is one of the.
This can be used to recover data from your Mac hard drive. It can restore videos and pictures and works on both external and storage devices. It has the unique feature of being both effective and efficient.
When you install BestCrypt, you can select 'Simple Interface' as the default mode. If the program ever opens in 'Advanced Mode', click the 'Application' tab and select 'Switch to simple mode'. Plug in the removable drive you want to encrypt. Select your removable drive shown in BestCrypt. Click 'Encrypt'.
What is the best SSD for Mac?
Intel SSD 320 Series is the best SSD for Mac Book Pro or Mac Air SSD upgrade. This 320 Series Disc delivers sequential read speeds of up to 270 MB/s and sequential write speeds of up to 220 MB/s fair enough for moderate use with MacBook Pro SSD upgrade.
What is the best backup drive for Mac?
Best Portable Backup Drive: Seagate Backup Plus Portable Drive for Mac. The portable version of Seagate’s Backup Plus drive is also a bargain. It’s the most affordable portable drive we cover in either the 2 TB or 4 TB capacities. The drive is mounted in a sturdy metal case, and the 4 TB case is a little thicker than the 2 TB version.
How secure are flash drives?
You may secure your flash drive by doing one of two actions: (1) purchasing security software for your existing non-secure flash drive or (2) purchasing a secure flash drive. Unlike a non-secure flash drive, a secure flash drive offers built-in security capabilities, which range from password to fingerprint access.
What is hard disk encryption?
Hard Drive Encryption. Definition - What does Hard Drive Encryption mean? Hard drive encryption is a technology that employes sophisticated mathematical functions to convert data stored on a hard drive into a form that is not recognizable to unauthorized persons.
How to Encrypt External Hard Drive? Full Guide Here!
Click , then enter an administrator name and password. Click Turn On FileVault. If other users have accounts on your Mac, you might see a message that each user must type in their password before they will be able to unlock the disk. For each user, click the Enable User button and enter the user's password.
Encryption on Windows PC: Encrypting a file or drive on a Windows PC is simple. Follow the steps below to enable the option: Click on This PC. Right-Click on the drive that you want to encrypt. Click on Turn on BitLocker. Check the option ' Use a Password to Unlock the Drive.' Enter and verify your password. Click on Next.
Windows 10 has a disk encryption tool called Bitlocker, with which you can password protect external hard drives connected to your PC. Bitlocker is for Windows 10 Pro and Enterprise editions only. Connect external hard drive to PC. Next, from ‘This PC,’ right-click on that external hard drive and click on ‘turn on BitLocker.’
Most modern operating systems such as Windows, macOS, and Linux come with built-in tools for encrypting your external hard drives or USB peripherals. For instance, you can use BitLocker for Windows, FileVault for Mac, and LUKS (Linux Unified Key Setup-on-disk-format) for Linux to encrypt your USB drives.
Method 1: Using Finder. 1. Open the Finder window and locate your external drive on it. 2. Then, r ight click (control + click) on the drive icon and select “ Encrypt (drive name) ” from the drop-down menu. 3. A dialogue box will open asking for you to create a strong password and a hint.
How to Encrypt Data on External Drives
Right-Click or CTRL+Click the drive in the Finder sidebar to choose the encrypt option. Enter a password of your choice to encrypt the drive. The encryption process of the drive can take time, depending upon the data in the drive and the speed of the drive. Encrypting External Hard drive in windows.

In the sidebar, select the storage device you want to encrypt. Click the Erase button in the toolbar. Enter a name for the volume. Click the Scheme pop-up menu, then choose GUID Partition Map. Click the Format pop-up menu, then choose an encrypted file system format. Enter and verify a password, then click Choose.
Step 1) Use the internal Mac volume or connect the external storage drive you wish to encrypt. Step 2) Launch Finder, and from the left pane, secondary-click a drive or volume and select the Encrypt ‘Drive_Name’ option. Step 3) Set a password and hint as requested by macOS. Wait till the hard drive encrypts.
The concept of hard drive encryption is simple enough. The encryption process uses sophisticated mathematical functions to protect the data from anyone without the appropriate password or key. This provides an additional layer of security , preventing hackers from entering.
One way is to use encryption software that comes with Windows or Mac OS or is developed by third parties. Another way is to buy a USB flash drive with pre-installed encrypting hardware. The pros of encrypting your flash drive . There is no doubt that if you need to use a flash drive, encryption is one of the best ways to safeguard your data.
How to encrypt a flash drive for Windows and macOS
Once encrypted, it will be converted to Mac OS Extended (Journaled, Encrypted) file system. Here are the steps to encrypt external USB with FileVault: Step #1. Open Finder and select external USB from the list of drives on the left. Step #2. Right-click and select Encrypt & flashdrivename>. Step #3.
Plug your thumb drive or generic mass storage medium into your Mac. Open Finder. Right-click the thumb drive in the left sidebar. It’ll be under Locations. Click on Encrypt “ (Name of mass storage drive)”. If you don’t see this option, skip to the note below. Finder will now prompt you to enter a password and a hint.
I opened the file and an infinity symbol loading image opened and after a second or two, disappeared. The details in the exe's windows properties say it is original filename is LeafCollectorSetup.exe. I did a MalwareBytes scan and a Windows Defender quick scan after the fact, both came up negative.
Step 1: Use a Windows system and connect your USB. Step 2: Enter your USB password to unlock the BitLocker encryption. Step 3: Now copy all the files to the Windows system and name the file accordingly. Step 4: Now go to 'My Computer', right click on the drive and format it.
I'm trying to encrypt an external drive of mine using Apple's built in drive encryption tool into OS X through Finder. The drive is formatted as Mac OS Extended(Journaled) and I'm plugging the drive through USB 2.0. Also I'm running Mavericks with all the latest updates.
How to Encrypt an External Hard Drive? (Windows + MAC)
Then head to system preferences in the option. Step 2: In this option, select Security and Privacy as an option. Lastly, click on the File Vault tab. Step 3: Here you have to click the option of 'Turn on the File Vault'. Step 4: Enter a strong password to complete the process of encryption to encrypt mac hard drive.
You can encrypt your entire hard drive, encrypt an external drive, or just create an encrypted container for your most important files. It’s a better situation than Windows 10, where full disk encryption is only offered on some PCs , and partial encryption depends on third party tools.
<bump> I would suggest looking into true hardware encryption (e.g. Apricorn Aegis Secure Key). I would reformat the device or hard drive (if not formatted already) to exFAT, which will handle large files natively on the Mac and PC for read/write.
1 Answer1. There’s no option for stopping and reversing the encryption process. It doesn’t matter that it is an external drive, as it is still the same processs as is used when enabling FileVault on internal drives. Note that if you unmount/unplug the drive, encryption will be paused - but it resumes the next time it is plugged in.
3. Click ( Protect USB Drive) in ( Protect USB) to create a portable virtual disk in USB disk. 4. Select ( Create a new portable Silo in my USB Drive) and click ( Next ). 5. Set a password for the virtual disk and click ( Next ). 6. Choose a range of the disk size and click ( Next) to wait for the encryption finished.
How to Encrypt an External Hard Drive or USB Flash Drive
OS X users needing to run Windows need to use VMware Fusion or Parallels. If you are ready to encrypt your hard drive. Dual Booting Encrypted Windows AND Encrypted OS X Lately I’ve needed Windows to work on some projects, but my usual method of running a Windows VM inside OS X wasn’t cutting it performance-wise.
The external hard drive format is HFS+ and i have macdrive as well, but it won't mount ever since i encrypted in lion with disk utility and the other partition that isn't encrypted just mount fine.
Step 4: Choose the method to unlock the drive. Here the iSunshare BitLocker Genius offers you two methods to unlock the drive: the password and the recovery key file. Normally, the password option will be the first consideration. You just need to type the passwor for BitLocker hard drive and the drive is unlocked in minutes.
Choose System and Security. BitLocker Drive Encryption. Or just right click on the device and select Turn on BitLocker. Setup your password to encrypt the hard drive. Windows 10. Go to “Setting” app. Select “System” option. Go to “ About” pane. Select ‘ ’Bitlocker settings’ ’ to enable this feature.
2. Choose the drive you’d like to encrypt and then click Manage tab. 3. Click BitLocker. 4. Click “Turn on BitLocker”. Note: You can also click This PC, right-click the USB drive you want to encrypt, and select “Turn on BitLocker”. 5. Wait a few seconds for BitLocker to setup.
6 Ways To Read Mac-Formatted Drive On Windows: Free & Paid
The BIOS is a pre-Windows environment that allows you to control the hardware of your computer with specific settings. Setting a hard drive password would essentially lock the drive and it would not be able to boot into Windows unless you provide the key. The key would then be required every single time the computer is turned on or rebooted.
3. Open Up Disk Utility. Disk Utility is the software on your Mac that will format your external hard drive for Mac and PC. You can find Disk Utility by clicking on the Application folder. Application Folder in Dock. Then click on the Utilities folder inside the Application folder. Utilities In Application’s Folder.
When you format your external hard drive, it should be formatted for Mac OS Extended. If you are transferring data from an OS 10 system to an OS 9 computer, or trying to access the data through OS 9 (with a drive formatted through OS 10), you will need to have installed OS 9 driverswhen you erase the drive.
Windows 8.X and Windows 10, at least with BitLocker, break with tradition, and only require that the used space on the drive be encrypted. So with full data loaded hard drive, it takes much longer than empty one, and 4tb might take even longer than encryption time of four 1TB drives. Regards, D. Wu
The best way to look for an incorrectly formatted drive is to go to. Apple (in the top toolbar menu) > About This Mac > Storage. See if the external drive shows up here. For more information, go to the same menu option, then select System Report. Mac not formatted to display external drives on the desktop.
Data Recovery Mac Hard Drive
How To Encrypt an External Hard Drive
The simplest and securest way to encrypt a PDF file is by applying a professional file lock and encrypt tool. EaseUS LockMyFile is a lightweight and reliable file protection software that can hide, lock, protect, and encrypt files on local and external hard drives in Windows 11/10/8/7.
My Book Essential hard drive. Continuing with this compilation of the best external hard drives with encryption, we want to recommend the My Book Essential from WD. A model that has AES 256-bit hardware encryption built into the WD Security software, so you just have to turn it on, set the password and start storing information safely.
Connect the drive you want password protected. Select the drive in Disk Utility, and click on the “Erase” tab. Pull down the “Format” menu and choose “Mac OS Extended (Journaled, Encrypted)”. Click on “Erase”. At the next screen, set a password – do not lose this password or you will lose access to the drives data.
This is a great external hard drive for your Mac if you are concerned about keeping your data safe and secure. Western Digital My Passport Ultra features cloud storage and 256-AES encryption. 6.
The external hard drive is widely used around the world, and many people like use BitLocker Drive Encryption to encrypt their external hard drive on Windows in order to protect personal data from being stolen by others. The only way to access an encrypted external hard drive is to type correct password so as to decrypt the external hard drive.
Access encrypted external drive
3 years limited. Seagate Portable External Hard Drive for Mac (USB 3.0) Check Price. on Amazon. PROS. This HDD is very simple to use. It connects to a computer (both Mac and Windows) within a second via USB 3.0 at the maximal speed of 120 Mb/s. CONS. It is a bit noisy when running.
This high-speed SSD for Windows and Mac is capable of reading/writing at lightning speed. In addition to the improved design and robust features, SanDisk Extreme 500 comes with 128-bit AES encryption software that helps you protect all your files wherever you go. This external SSD hard drive comes with a durable case and compact design.
But base from what I have read on the problem, you might have to wipe the external hard drive clean again and then re do your Vera-crypt encryption. While your redoing the encryption, I would pick the ext format, ether ext or ext4 would work. This format tends to work more with Mac OS do to its nature.
4. Never print a backup key on paper and store it somewhere. If someone, even the police, can get access to that paper, they can decrypt your entire hard drive. Now let’s talk about actually enabling BitLocker. Open the Control Panel in Windows and click on BitLocker Drive Encryption.
Look for what you called the drive when you originally partitioned it. This will delete all data from this partition, which is the only way to unpartition a drive. For Windows 7 and Vista users: Right click the same partition and select 'Delete Partition' from the menu. You should now see the partition as unallocated space.
How to Encrypt a Hard Drive on Windows 10 (2021)
Microsoft introduced BitLocker encryption feature since the release of Windows Vista and it becomes a native tool for encrypting internal partition and external drives (USB, hard drive or SSD). And it is much more accessible on modern Windows PCs and laptops as an integrated part of Windows OS.
UkeySoft File Lock is a data security software that uses AES 256-bit military-grade encryption algorithm technology, it can help you password protect files/folders your USB flash drive, but also enables you hide files and folders on internal hard drive, flash drive, external USB drive, thumb drive, memory card, pen drive, and network drive.
Connect your external hard drive to PC and right-click on 'Start', select 'Search'. Step 2. Type: Command Prompt in the Search box and click Command Prompt to bring it up. Sign in with your administrator account and password if the system asks. Step 3. Type: E: and hit Enter. (Replace E: with the drive letter of your USB, pen drive.) Step 4.
G-Technology G-Drive Mobile 1TB. Best for Photographers. Price: $99.00. Get it now on Shopee. Compatible with both Mac and Window users, the G-Drive is one of the most in-demand hard drives in the market today Despite its price tag, most customers really like investing in this hard drive given its special features.
Using VeraCrypt, you have three different ways to encrypt your files. Using one of the options, you can encrypt an entire drive, which means, all the files within the drive will be encrypted. The second option will encrypt the system partition or drive. The third or the best option is to create a virtual drive and encrypt the same.
How to Encrypt, Decrypt Mac Hard Drive and Recover Files
Recover Files From External Hard Drive Mac Free Without
Seagate Backup Plus Hub 4 TB External HDD - USB 3.0 for Windows and Mac, 3 yr Data Recovery Services, Desktop Hard Drive with 2 USB Ports and 4 Month Adobe CC Photography (STEL4000300) 4.4 out of 5 stars 5,104
WD - My Passport for Mac 4TB External USB 3.0 Portable Hard Drive - Blue. User rating, 4.7 out of 5 stars with 255 reviews. (255) $109.99. Your price for this item is $ 109.99. $129.99. The previous price for this item was $ 129.99. WD - My Passport Ultra 1TB External USB 3.0 Portable Hard Drive - Silver.
WD My Book 12TB Desktop External Hard Drive for Windows/Mac/Laptop, USB 3.0 Black (WDBBGB0120HBK-NESN) ( 226) ( 1) Write a Review. See more ' wd my book '. In stock. Limit 100 per customer. Ships from United States. Capacity: 12TB. 3TB.
It can scan hard drives, SSDs, and removable media to recover deleted encrypted image files and folders on Mac and Windows systems. Regardless of the reason behind the photo loss, its advanced algorithms ensure you get back the encrypted pictures in their original form.
It measures 6.7x5.5x1.9 inches. For a USB 3.0 enclosure using a 3.5' HDD it reads and writes at about 165MB/s. The WD software is quite easy to use and allows for password protection to unlock the drive as well as scanning utilities to detect bad sectors. Overall, it's a solid product and works as advertised.
Recover Files From External Hard Drive Mac Free
How To Encrypt Your Hard Drive? (Ultimate 2021 Guide)
Recover Files From External Hard Drive Mac Free Trial

Ensure important data is safe with this black external desktop Seagate Backup Plus Hub 4TB hard drive. Desktop drive in black features 4TB storage capacity and PC and Mac compatibility. Uses USB 3.0 for ultra-fast data transfer and works with USB 2.0 ports on older machines. View all product Details & Specifications. $99.99.
1 note
·
View note
Text
Myst Mac Free

Island In The Mist
Cyan Inc. sure have been busy over the last little while – this month has seen early, unused assets from their puzzle-based MMO game Myst Online: Uru Live released, along with full playable prototype levels. Now, the Myst fandom have another event to add to their diaries – a remade and remastered version of Myst is coming to PC and Mac later this year.

This certainly isn’t the first time that Myst has gotten a remaster – Myst: Masterpiece Edition, realMyst: Interactive 3D Edition and realMyst: Masterpiece Edition have all brought new gameplay and graphics updates to the puzzle classic on the PC. The upcoming release of Myst, however, is a reworked version of the 2020 Oculus Quest port, complete with the puzzle randomization and VR support added in that port.
Myst 2 (Riven) for Mac OSX. Play the old classic Riven, Myst 2, for Mac OSX. Just download this great open source program and insert your old Riven CD or DVD and start playing. Besides the original disc, you will also need at least OS 10.6.8. Myst was a great point and click adventure game from back in my day. Myst Online 1.0 for Mac is free to download from our software library. This free software for Mac OS X is a product of Cyan Worlds Inc. The most popular version of the program is 1.0. Myst Online for Mac belongs to Games. This program's bundle is identified as com.TransGaming.UruLauncher.
Myst For Mac Free
Cyan Inc consider the upcoming release of Myst to be their “definitive version” – it’s been remade from the ground up, without input from any other developers along the way. The Oculus edition of Myst was already the most user-friendly version of the game to date, with top-quality sound design and upgraded graphics adding to the immersive VR experience.
The Oculus edition also carries over a feature from the oft-maligned realMyst: Interactive 3D Edition with an overhaul of the gameplay – while the original Myst had set paths through its mysterious world, realMyst added free-roaming. Now that the upcoming PC and Mac releases have the options to play through the game without a VR headset, the best version of Myst is more accessible than ever before.
Myst is due to be released on PC and Mac in Q3 of this year, with possible releases on other consoles to be announced in the future. While the exact release date hasn’t been announced quite yet, Cyan Inc. say it’s “VERY soon”. It’s available to add to your wishlist on Steam and GOG now!
Did you know it’s still possible to run the original version of Myst on modern Mac OS X? Here’s how to do it.
What you will need:

Myst Mac Free Download
Original Mac Myst CD
“Chubby Bunny” Classic on Intel software
Myst 25th Anniversary Collection Retail

Myst Mac Free Play
In OS X:

Make a disc image of the Myst CD in Disk Utility as a .cdr file.
Download and expand COIV4.0.1+.zip from the link above.
From the COIV4.0.1+ folder, expand “800Meg.blank HD.dmg.zip”, then place 800Meg.dmg into /Users/Shared/. This will be the hard drive for the OS9 environment.
Mount 800Meg.dmg and copy your Myst.cdr onto it.
Unmount 800Meg.
Run Classic.app.
In OS 9:
Open the System Folder/Extensions and trash the QuickTime, QuickTime MPEG, QuickTime PowerPlug, QuickTime VR extension as well as the QuickTime Extensions Folder. This version of QuickTime doesn’t work with Myst, so we will use the version on the Myst CD.
Open the 800Meg hard drive and mount Myst.cdr using Disc Copy.
Copy the QuickTime extension from the Myst CD into the System Folder/Extensions.
Restart OS9.
Now mount the Myst CD just like before, run Myst and enjoy.
1 note
·
View note
Text
How To Download Video From Jvc Everio To Mac
Yesterday I posted under a different forum about complications converting Everio .MOD hard disk files into a format that can be used in iMovie, but today I found a pretty easy solution based on Quicktime MPEG-2 Player, DVDrop and iMovie. BACKGROUND: JVC Everio camcorders use hard disk media to record video files which is great for navigating directly to the video you want to edit. The camera stores the video in a .MOD file in an MPEG-2 format. JVC provides software called Capty MPEG Edit EX for Evario, but it is not quality editing software and not worth the time to learn. PROBLEM: iMovie can’t access the camera directly to import the video and Quicktime Pro doesn’t even understand the MPEG-2 format. REQUIREMENTS: a. dowload and install DVDrop. This converts the .MOD MPEG-2 formatted video into standard Digital Video (DV) for iMovie. (see www.dropdv.com) b. Optional - dowload and install Quicktime MPEG-2 player so you can preview clips before you burn disk space and time converting them to DV and importing to iMovie. (see www.apple.com/quicktime/mpeg2) WORKFLOW SOLUTION: a. Create a folder on the desktop and download the entire SD-VIDEO folder the camera hard disk to your new work folder b. open the new folder in Finder and using the search function find all the .MOI files. Then highlight all the .MOI files and drag them to the trash. These are files that contain junk the camera faluted on and not real video data. c. Next use Quicktime to preview the imported clips to verify which ones you want to convert. Delete any files that you don’t want in your movie. NOTE: You may need to change the name of the file from .MOD to .mpeg. Also, you won’t have audio because of a long technical discussion dealing with the codec for MPEG-2 and demux’ing it etc. d. Now highlight all the files the folder, which after deleting the .MOI’s and reviewing in Quicktime will only contain the desired files for the movie. Drag all these files in one group onto the DropDV icon and it will convert to DV and create a folder on the desktop. e. Open the desktop folder and click on the “imovie project” folder. This will launch iMovie and all your desired clips will be there including the audio you couldn’t hear in Quicktime. Hope this saves someone the sleep I lost staying up all night to figure it out, Zac
Everio Software
Download Video From Dailymotion
How To Download Videos From Jvc Everio To Mac
Everio Software
HD Everio makes it easy to record 'now' and enjoy 'forever'. This future-ready image quality is made possible by a combination of superior basic performance and enhanced enjoyment functions.
Let us help you install your JVC Everio software and hook up your JVC Everio G video camera to your computer. Just select your operating system. In this video tutorial, you'll see how to easily get your JVC Everio G camera recordings into you Mac to create your very own movies. Once connected, it's very similar to a DV camcorder. Sap2000 v17 crack. A quick guide on how to connect your JVC Everio to a Mac.Please note this guide does not cover the HD versions.

Applicable Models :
Everio features A.I.S. (Advanced Image Stabiliser) technology for effective camera-shake compensation, especially in the wide-angle range. K2 Technology The same audio technology used in recording studios to restore sound elements that are lost during digital compression, assures realistic sound of.
Jvc Everio free download - Everio sync. 2, JVC Web Camera, JVC Remote, and many more programs.
Connect the JVC Everio Hard Drive camcorder to your mac via the included USB cable 2. How to open the hard drive, 3. Locate the video files, 4. Move them to your desired drive, 5. Step1 Run the JVC software that comes with your camcorder on the computer.
No Installation Disc – It’s built into Everio*
Because it's built right into the Everio camera itself*, the new Everio MediaBrowser 3 can be installed directly on your PC right after connecting via USB. No CD required!
Purchased in US at Costco for $219 comes bundled with, carrying case, 8gb SD card, data battery 700mah, usb/av cables.
*Not available with some models. For details please refer to the comparison chart in Lineup page.
JVC Everio - Software to Download Video. JVC GZ-MG330 You also can Copy or Move Video from HHD to Micro SD Card if Needed ( this is how ).
I recconmend you to watch this video in the full screen player. This video shows how to import and play the files from a jvc everio gz seris to a mac compute.
Easy-to-Use Integrated Software
Everio MediaBrowser 3 is high-value software that provides everything from viewing, data management, simple video/stills editing, as well as easy sharing functions, within a single application. For honor steam activation code free.
Quick Upload to Facebook/YouTube™
Share as soon as you shoot. Uploading to Facebook and YouTube™ is as easy as following just a few steps that are displayed on the screen.
Create with Easy Video and Still Editing
Everio MediaBrowser 3 lets you create full-fledged edited videos and pictures with ease. Edit video footage and stills into the same creation, spice it up with a music track, add captions, and so much more, with drag-and-drop ease!

Software System Requirements (Windows®)
OS:Microsoft® Windows® XP SP3, Home Edition/Professional (pre-installed) Microsoft® Windows Vista® SP2,Home Basic/Home Premium (32-bit/64-bit,pre-installed) Microsoft® Windows® 7,Home Premium (32-bit/64-bit,pre-installed)CPU:When using HD Video: Intel® Core™ Duo 1.66GHz or higher (Intel® Core™ 2 Duo 2.13GHz or higher recommended), Intel® Core™ i7 2.53GHz or higher recommended for HD video editing When using SD video: Intel® Pentium® 4 3GHz or higher (Intel® Pentium® D 3.0GHz or higher recommended), Intel® Core™ 2 Quad 2.4GHz or higher recommended for SD video editingRAM:Windows® XP: 1GB or higher, Windows Vista®/Windows® 7: 2GB or higherGPU:Intel G965 (on-board VGA) or higher
Note: Software for Macintosh is not included. The applicable software is required. The system requirements information above is not a guarantee that the provided software will work on all personal computers meeting those requirements.
Download Video From Dailymotion
Applicable Models :
DVD Burner
CU-VD50
Direct HD Burner/Player
• Can create AVCHD discs playable on other compatible players • Playback directly on your TV/display • HDMI®, Component (Y, Pb, Pr) output, Audio/Video output • Remote control provided • USB cable provided
CU-VD3

Direct HD Burner
• Can create AVCHD discs playable on other compatible players • Portable design with super slim drive • Compact AC adapter • Storable USB cable
Common Features
Jvc Everio Hdd Software Download
• Easy HD data disc creation without using a PC
• Direct connection with Everio via USB
• DVD burning operation can be controlled by Everio
• Uses DVD-R/-RW disc, DVD-R DL disc supported
• Can be used horizontally or vertically (Stand included)
How To Download Videos From Jvc Everio To Mac
Jvc Everio Software For Pc
*Footage recorded in the UXP mode cannot be stored to disc using the CU-VD50/VD3. Use the supplied MediaBrowser software installed on your PC to store footage onto hard disk drive.
Free Download Jvc Everio Software
1 note
·
View note
Text
Dvd Burner Free Mac

Dvd Burner Free Mac Download
Free Dvd Burner For Windows 10
Dvd Burner free. software download
Dvd Burner Software Free Mac
How-to >DVD/CD Burner
Thanks to modern technology and competition, it’s now effortless to find a free DVD burner for Mac. With a DVD burner, you can seamlessly share or backup your media files to a USB stick, mobile phone, external hard drive, or even cloud storage. It’s because of this that burning DVDs is even more crucial than before. In this insightful article, I’ve listed the best free DVD burning software for Mac. So keep reading to find and download your favorite DVD burner for Macintosh.
Free DVD Video Burner is a popular DVD maker which can write prepared folders from your PC (hard drive) to a DVD disc. It is designed with a very simple interface. Free DVD Video Burner. And this free DVD video burner contains no spyware or adware.
Download Latest Version for Mac (6.47 MB) Advertisement. Express Burn Free CD and DVD Burner for Mac is a free CD and DVD burning program for the Mac platform. With it you can burn audio CDs and data CDs for free. The Free version also lets you trial some of the the advanced features of Video DVD burning.
Burn Mp4 To Dvd Mac Free No Watermark How to Burn a DVD on Mac OS X (EL Capitan and Yosemite included) Check the step by step guide on how to burn a DVD on a Mac by using the best DVD burning software for Mac (OS X EL Capitan, Yosemite, Mavericks, Mountain Lion, Lion and Snow Leopard). Step 1: Launch the DVD Burner for Mac After you download.
Part 1: Best 10 Free DVD Burner for Mac
There are quite several DVD burners for Mac with varying features and functions. This might make it difficult for you to decide the best pick. To help you out, here is a list of the best free DVD burning software for Mac to choose from:
1. Burn
Burn is a popular DVD burner for Mac that is simple to use but very powerful and efficient. In fact, this program supports DVD burning of almost all file types. With Burn DVD creator, you can create DVD/CDs on Mac OS and convert to any file format if needed.
What's more? You can create an interactive DVD menu as well as change other DVD parameters like file dates, disc icon file permission, and plenty more. And yes, you can use this powerful program without paying a dime.
2. Free Video Converter
Wondershare Free Video Converter is another decent conversion program that also doubles up as a DVD burner. With this tool, you can convert your files to any file format and then proceed to burn it to DVD or Blu-ray disc. You’re also allowed to customize your media files by adding features like menu template, TV standard, subtitles, and many more. And apart from using this DVD burner on Mac, you can also download and use it on Windows PC as well.
3. iTunes
Are you surprised to find iTunes in our ultimate DVD burning software list? Well, don’t be because iTunes is an all in one program. iTunes empowers users to organize and play movies, TV shows, and of course, music according to their preferences. You can import files from other storage sources in any format you wish. With iTunes, you can burn any iTunes downloaded video/audio to DVD/CD/Blu-ray without any problems. All in all, this is arguably the best DVD burner for Mac free download you can find.
4. Diso
If you think that Disco is all about pretty looks, then you better think again. That’s because this powerful software supports both the burning and erasing of CD/DVD. Back to the looks, this program emits 3D animated smoke every time the app is burning a disc. To download Disco, you can use the name FREE DISCO and then enter the code DISCO-111-113-199-99.
5. DVDStyler
DVDStyler is another DVD authoring app that allows users to create professional-looking DVDs. With this tool, you can design a DVD menu, create photo slideshow, add audio tracks/subtitles, and many more. Furthermore, it supports the burning of AVI, MOV, WMV, MP2, and many other file formats. Just keep in mind that this open-source software can only be used to burn DVDs.
6. BurnX Free
If you’re using Mac OS X or previous versions, BurnX Free should sort you out. This light program comes in several languages, including French, English, and Spanish. This way, users from all over the world can use it to burn DVDs and CDs conveniently. Mac users can also erase or add files to their DVDs.
7. Liquid CD
Liquid CD is an excellent Mac DVD burning software that comes with a pretty straightforward interface. With it, you can burn videos as well as photos to DVD. Moreover, the burning of audio/music files to CD is also allowed. And if needed, you can also create ISO image files to a CD or DVD.
8. SimplyBurns
SimplyBurns is an open-source DVD burner that lives up to its name – burn DVDs quickly. It has a simple and easy to navigate interface, allowing you to burn files to CD/DVD seamlessly. Simply Burns also comes with additional features like duplication mode, audio and data project, disc ripping, and burn image.
9. Express Burn
Express Burn is a DVD burner that is easy to use and powerful as well. All you have to do is to drag and drop files into the app and leave the rest to it. You can burn Blu-ray, DVD, and CD with ultra-fast speeds while keeping the original quality. Surprisingly, you can also download a smartphone app for this program.
10. Bombono DVD
Bombono DVD is the last DVD authoring program on our list that has a nice and clean GUI. Apart from helping you make DVD and ISO image, you can also use it to re-author DVDs. On top of it, you can import files from DVDs.
Part 2:Professional DVD Burner for Mac with Fully Packed Features
If you’re after a free program to burn DVDs on Mac with lossless quality, then look no further than UniConverter. This powerful program comes with an intuitive interface that will allow you to create professional-looking DVDs easily.
iSkysoft DVD Burner Features:
Burn files to DVD/Blu-ray/ISO on Mac with lossless quality.
Edit files before DVD conversion.
Make photo slideshows to DVD/Blu-ray/ISO with music.
Customize DVD templates before DVD conversion.
Built-in video editor for cropping, trimming, rotating, and adding subtitles/watermarks/effects.
Burning audios, images, and videos to DVD with real-time preview.
Features an all-in-one toolbox with a GIF maker, screen recorder, CD ripper, file transfer, and many more.
Step by step process to burn DVD with professional DVD burner for Mac:
Step 1: Launch Professional DVD burner on Mac and select Burn tab
Open UniConverter and then select the Burn tab.
Step 2: Import and Edit Video Files
You can now click the + sign or click on the + Add Files button to import video files. You also have an option to drag and drop your files to the interface. Next, click on one of the three edit icons below each thumbnail to edit your video. You can cut, trim, add effects, and many more.
Step 3: Customize DVD menu templates
Just beside the default DVD menu template name, you’ll see a small pencil-like icon that you’ll click on. A small pop-up window will appear with a list of DVD templates to choose from. You can also add background music or picture.
Step 4: Burn DVD on Mac
You can preview your files to see if they suit your preferences and make changes if need be. Next, insert a Blank DVD on your computer’s disc drive and then click on the Burn video to drop-down menu. Select your DVD and then click the Burn button to start the conversion process.
If you’re after faster conversion speed, lossless quality, and lots of DVD features, then UniConverter should be your first pic. You’ll also get additional features like unlimited memory, a progress bar, frequent updates, etc.
ISO Image Burner - Free ISO image CD/DVD Burning Software
ISO Image Burner is a useful tool that can help you to burn your ISO image files to CD/DVD Disc, support CD-R, DVD-R, DVD+R, CD-RW, DVD-RW, DL DVD+RW, HD DVD and Blu-ray Disc. It has ability to make bootable CD/DVD image file, process the boot information for CD/DVD image file, and have many other burning options, include test write, finalize disc and more.
This handy utility is easy to use very much, at the best, ISO Image Burner is 100% free, be free for both personal and commercial use, install or uninstall is very simple, burn your ISO image on the fly. Program support standard ISO9660 (default) and Joliet File System. This program can also be used to erase CD-RW media.
Dvd Burner Free Mac Download

Download
Latest Version:1.1File Size:609 KBLanguage:EnglishPlatform:Windows XP/2003/Vista/7/8License Type:Freeware
The default CD File System is ISO-9660, it is a standard CD-ROM file system that allows you to read the same CD-ROM whether you are on the Windows, Linux/UNIX, Mac or other major computer. The default write speed is MAX, this parameter sets the burn speed of the CD burner to maximum, the burn speed is limited by the maximum speed of the burner.
How to Burn ISO Image
Free Dvd Burner For Windows 10
Bellow this step by step about how to create a CD from ISO image file:
Download the install package of ISO Image Burner.
Run the install package, install this program.
Run this program.
Choice one ISO image file.
Insert a blank CD/DVD disk (recordable disc) in your CD-RW drive.
Click the 'Burn' button to start the burning process.
Burning Options
Test Write - In order to test a system's performance without wasting valuable media, recorders allowed for a test write which would simulate the recording process.
Finalize Disc - after burning is complete performs media finalizing.
UDF Bridge - sometimes called UDF/ISO, is a DVD-ROM format used to make DVD-ROM media compatible with Windows 95 computers. Because UDF wasn't supported by Windows until Microsoft shipped Windows 98, DVD providers were forced to use an interim format called UDF Bridge.
Joliet File System - An extension to the ISO 9660 CD-ROM file format from Microsoft that supports Windows long file names starting with Windows 95. Joliet supports the original 8.3 naming convention for compatibility with DOS and Windows 3.1 and also supports the Unicode character set.
Underrun Protection - Most modern CD/DVD writers implement some form of buffer-underrun protection. A buffer-underrun occurs when the writer's buffer (high speed memory built into the writer itself for organizing data prior to writing it onto the disk) become empty of data before the writing process is complete. This leaves the new CD spinning in the drive while no data is available to be written to it, resulting in the writer essentially 'losing its place' on the disk and creating a useless CD.
Import Session - Multisession discs can be burned in multiple sessions until you have reached the maximum disc capacity. A session is a self-contained data area that is burned using a single process, and consists of a lead-in (with the table of contents), and one or more tracks and a lead-out. Discs without the multisession option, e.g. Audio CDs, are burned in a single session.
Volume ID - change data disc Volume ID (support unicode).
Cache Size - size of the cache buffer in megabytes.
Boot Image - burn a bootable CD/DVD if you include the boot image.
How to erase files from a CD-RW with ISO Image Burner
ISO Image Burner support to erase the files from a CD-RW (re-writable disc) if your computer is equipped with a CD recorder, Before you can reuse a CD-RW or DVD-RW disc, you must erase it. You can use ISO Image Burner to erase CD-RW and DVD-RW discs.
Dvd Burner free. software download
When you erase the disc, you can select 'Quick Erase' (quickly) or 'Full Erase' (slowly) button in program main interface. If you do, ISO Image Burner can prepare the disc so that you can write over the existing data but it doesn't actually erase the data. If you don't select 'Quick Erase', ISO Image Burner overwrites the entire disc with zeros, which takes longer.
Dvd Burner Software Free Mac
Copyright © 2009 ISOImageBurn.com, All rights reserved. Support and Contact
1 note
·
View note
Text
10 tech tricks you'll use again and again
Everyone enjoys a good prank. There's nearly always some shortcut we've never learned, no matter how well we know an app or program. The same is true with hardware: we may use gadgets on a daily basis without realizing their useful features.
Zoom is an excellent example, which millions of Americans have only just found. Tap or click here for 11 Zoom tips you'll wish you'd known sooner.
You may spend a lot of time in quarantine using the technology you already own, especially if you work from home. You may be doing things “the hard way” when you could be saving money by cutting corners.
Speaking of free, touch or click here for 15 free tech upgrades, including free products like Adobe Photoshop and Microsoft Office.
Here are a few of my favorite popular tech tips, tricks, and shortcuts for various apps and tools:
1. Insert your USB drive correctly the first time.
It feels like a no-brainer to connect a USB cord correctly. So, why do we frequently do things wrong on the first try?
Here's the deal: Take any USB cable you have lying around the home. Notice the emblem on one side? It is more than just branding or adornment. If you plug in horizontally, the USB symbol will face you; if you plug in vertically, the USB symbol will face you. You are now aware.
While you're organizing your tech life, tap or click here for seven tips on how to save money on your internet service.
2. Reopen a previously closed browser tab
It occurs on a regular basis. You have a dozen tabs open in your browser and unintentionally close one of them. You could either access your browser's history and reopen the tab from there, or you could accomplish it with a few keystrokes.
To reopen the tab you just closed, press Ctrl+Shift+T on a PC or Command+Shift+T on a Mac.
3. At a specific point, share a YouTube video.
If you see anything in a YouTube video that you want to share at a specific point, you can obtain a link that brings people directly to that spot. Click the Share icon to the right of the video. Look for a checkbox to the right of the link. It will automatically indicate the time at which the video is currently paused.
You have the option of continuing at this time or changing it. Copy the link and share it on your chosen social media platform or send it to a friend through email. When someone clicks on the link, the YouTube video will immediately go to the point you specified.
4. Use "Site:" to find content like a ninja.
Millions of results can be returned by a Google search. Reduce that greatly by using Google's Site: option to search only one site. Open Google in your browser and type "site:" followed by the website you want to search for. Just like this: “site:joomtechsolutions.com,” but without quotation marks.
A tip on a tip: Instead of going to Google, insert “site:joomtechsolutions.com search term” in your browser's URL bar. Again, no quotation marks are required.
5. Report junk texts and stick them to the scammers
Junk SMS messages are vexing, to say the least. You can block them, but taking action also feels fantastic.
With just a few clicks, you can report SMS to the GSMA's Reporting Service. Send the message to 7726 (can you guess what that means?) Alternatively, in your messaging app, simply select "Report Junk."
6. In Google Docs, you can use your voice.
I'm sure you already use your phone's speech-to-text feature to dictate texts or emails, but did you know you can do the same in Google Docs? It's free and surprisingly effective.
Open a new Google Docs document and select Voice Typing from the Tools menu. Then you can begin dictating. Voice Typing also understands commands like "comma," "period," and "new paragraph."
7. Use Disney Plus to download movies
Downloading video content and watching it offline is handled differently by each streaming service. Until 2016, Netflix was a huge holdout. However, Disney Plus immediately allowed this choice. At the bottom of the menu, there is a download icon. You can also download as many titles as your hard disc can store with the Disney Plus app.
8. Take a screenshot and crop it.
Screenshots are ubiquitous, but you frequently capture more than you require. Exposing too much of your screen in a single image can put your security at risk. Instead, snap a screenshot with exact cropping to ensure that only what you want is included.
Press Command + Shift + 5 on a Mac to bring up a rectangle that you can alter as much as you want.
On Windows 10, go to Start, type Snipping Tool into the Search Bar, then press Enter. This will give you a comparable box that you may move around your screen in any shape you choose.
9. Look through WhatsApp chats.
Messages accrue over time, regardless of platform. We're looking for that one funny quotation or a crucial street address, but it's buried in a jumbled sea. Although WhatsApp is the most downloaded software of the decade, many users are unaware that you can search your messages in the same way that you can with Google.
There is a search bar in iOS versions and a search icon in Android versions. In any case, seek for words that are distinctive to a particular conversation to help you identify the exact message you're looking for.
10. Cancel an email
Did you just send an email to everyone that was intended for only one person? Gmail, on the other hand, allows you to unsend an email by modifying one setting before to writing your email.
This message recall also allows you to change spelling mistakes, erroneous recipients, the subject line, and even append missed attachments.
Bonus Tip: How to Sign a PDF Electronically
In many offices across the country, PDFs are already replacing printed papers. They are more adaptable, portable, and convenient to use – but not everyone is aware that you can sign a PDF document in the same way you would a real one.
Almost every PDF-reading application includes a capability for electronically signing papers and forms. To learn how to do it, tap or click here.
The Kim Komando Show, the nation's largest weekend radio discussion show, will keep you up to date on all the latest technologies. Kim answers phones and gives guidance on today's digital lifestyle, from smartphones and tablets to online privacy and data hacking.
2 notes
·
View notes